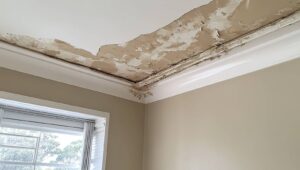
When a ceiling starts to show a little trouble, you’re usually looking at a leak that needs prompt attention. Water Damage Repair should begin by stopping the water source, then inspecting for damage, drying the area completely, repairing stains or sagging drywall, and sealing the conditions that let moisture in. Each step matters because a minor issue can spread fast if you miss it.
Key Takeaways
- Shut off the water supply immediately and locate the leak source above the ceiling.
- Inspect the ceiling for stains, sagging, bubbling paint, and other visible water damage.
- Dry the area thoroughly with fans and dehumidifiers, keeping humidity low.
- Repair damaged drywall by removing weak sections, patching, priming, and repainting.
- Prevent future leaks by fixing the source and checking roof, plumbing, and drainage regularly.
How to Stop the Ceiling Leak
Before you do any repair work, stop the leak at its source by shutting off the water supply to the affected fixture or line if possible. Then inspect the area above the ceiling for visible plumbing, roof, or HVAC damage.
Use leak detection to confirm where water enters, checking fittings, valves, supply lines, and penetrations. If you find a loose connection, tighten it carefully; if a supply line is split, replace it.
For roof or HVAC leaks, isolate the source and use temporary sealants only as short-term repair methods. Place a bucket under active drips and move belongings away.
If you can’t reach the source safely, call a licensed pro. You’re not handling this alone; a careful, methodical response protects your space and keeps the problem from spreading.
Check for Ceiling Water Damage
Inspect the ceiling carefully for signs of water damage, including staining, sagging, bubbling paint, peeling drywall tape, and soft or swollen areas around the leak.
During this ceiling inspection, map each affected section so you can compare the damage to surrounding areas. Use a flashlight to catch subtle discoloration and track the stain edges, since they often reveal how far moisture traveled.
Press gently on suspect spots; any give can indicate weakened drywall or saturated materials. Record the size, shape, and location of every mark for your moisture assessment.
If you’re working with a repair crew, share these notes so everyone stays aligned. A thorough check helps you catch hidden damage early, protect your home, and move forward with confidence as a team.
Dry the Ceiling Thoroughly
Dry the ceiling as quickly as possible to limit mold growth and further material failure.
Start with a moisture assessment so you know which sections still hold water and where airflow needs to focus.
Use drying techniques that match the ceiling material: run fans to move air across the surface, set up a dehumidifier to pull humidity from the room, and keep windows closed if outdoor air is damp.
Remove wet insulation or loose debris only if it’s accessible and safe, then continue drying the exposed area.
Check progress every few hours and reposition equipment as needed.
You’re not handling this alone; steady, methodical drying protects your space and helps your home recover with less risk and less stress.
Repair Ceiling Stains, Sagging, and Cracks
Once the ceiling is fully dry, assess the damage and repair each defect by type: stain, sag, or crack.
For stains, scrub loose residue, then use stain removal with a shellac-based primer before repainting.
If the surface feels soft or bowed, cut away damaged drywall to the nearest joist, install a new patch, tape the joints, and apply joint compound in thin coats. Let each coat dry, then sand it smooth.
For cracks, open the line slightly with a utility knife, remove dust, and perform crack filling with setting-type compound or flexible patch paste. Feather the edges so the repair blends cleanly.
Match the texture and finish, then repaint the area for a uniform result that helps you feel confident in your space.
Prevent Future Ceiling Leaks
To prevent future ceiling leaks, track down and fix the water source before you close up the repair; a ceiling patch won’t hold if the roof, plumbing line, flashing, or HVAC drain still leaks.
Use leak detection methods like visual inspections, moisture meters, and dye tests to pinpoint hidden failures. Then seal roof penetrations, replace damaged pipe fittings, clear condensate drains, and resecure loose flashing.
After the repair, monitor the area after heavy rain or appliance use so you catch new moisture early.
Follow simple maintenance tips: clean gutters, inspect attic insulation, check caulking, and service plumbing fixtures on schedule.
When you stay proactive, you protect your home and join a group of owners who stop small problems before they become costly damage.
Frequently Asked Questions
Can I Use a Fan to Dry Wet Ceiling Insulation?
Yes, you can use a fan, but its fan effectiveness on insulation drying is limited. You’ll improve airflow, yet wet insulation often stays damp, so you should remove saturated material and verify hidden moisture.
How Do I Know if Ceiling Water Damage Is Structural?
You’ll know it’s structural if your theory checks out during a ceiling inspection: sagging, cracks, or worsening water stains often mean framing damage. You should call a pro, because you’re not alone here.
Should I File an Insurance Claim for a Ceiling Leak?
Yes, you should file a claim if the damage is sudden, extensive, or your policy covers water intrusion; review insurance coverage first, document everything, and schedule leak prevention repairs fast, so you stay protected.
When Is It Safe to Repaint a Repaired Ceiling?
You can repaint once the patch is dry, the surface is firm, and the stain’s gone. Check drying times, follow repainting techniques, and test for coolness or softness; you’ll join a finished, durable ceiling.
Do I Need a Professional to Test for Hidden Mold?
Yes, you should consider a professional if you suspect hidden mold; they’ll use mold detection methods and moisture meters to find hidden moisture. You’ll get precise results, faster remediation, and peace of mind.
Review
By stopping the leak first, you give your ceiling a chance to recover. As you inspect, dry, and repair each damaged area, you’re not just fixing drywall—you’re restoring the quiet strength above you. When you seal roof openings, clear drains, and check for moisture, you keep small problems from becoming stains, sagging, or collapse. Stay proactive, and your ceiling can remain solid, dry, and reliable through the next storm.