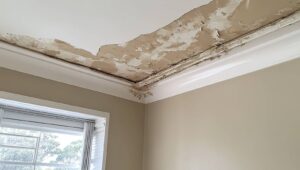
Many homeowners will face some type of water damage, and a ceiling leak can turn serious fast. You need to stop the source, contain the drip, and check for hidden damage before the ceiling sags or mold starts. Dry the area, inspect the stain, and repair the cause, but there’s one step many people miss that can save the ceiling.
Key Takeaways
- Stop the leak source immediately and shut off water if needed to prevent further ceiling damage.
- Contain dripping water with buckets or towels, move furniture away, and protect the area with plastic sheeting.
- Dry the ceiling quickly using fans, ventilation, and a dehumidifier, then check daily for soft spots or mold.
- Inspect the attic, roof, plumbing, and flashing to find and repair the leak source or call a licensed professional.
- Document the damage with photos for insurance and repair sagging drywall, stains, or cracks after everything is fully dry.
Stop the Ceiling Leak Right Away
First, stop the source of the leak right away so the damage doesn’t spread. If you can reach the valve, shut off the water supply now.
If the leak comes from rain, cover the damaged area with a tarp or plastic sheeting until repairs start. Use emergency measures to reduce active dripping, but don’t rely on them long term.
Check nearby fixtures, attic pipes, and roof penetrations for obvious failures. If the problem involves electricity, stay clear and call a pro.
You can use temporary fixes like tightening a loose fitting or redirecting flow into a bucket, but keep your team safe first.
Then document the damage and contact a licensed plumber or roofer so you can get back to normal fast.
How to Contain Ceiling Leak Damage
Once the leak is under control, you need to contain the damage quickly to keep water from spreading through the ceiling, walls, and flooring. Set buckets, pans, or towels beneath active drips, and move furniture, rugs, and electronics away from the area.
Use plastic sheeting or tarps for temporary containment, sealing edges with tape if you can. Open windows and run fans to improve airflow, but keep cords clear of wet spots.
If water is pooling, place a sturdy container under the lowest point and empty it often. These emergency measures help you protect your home and stay in control with the crew.
- Cover nearby belongings
- Wipe standing water
- Mark unsafe spots
- Keep the area dry
Check for Hidden Ceiling Water Damage
Check the ceiling for stains, discoloration, and any dark rings that suggest trapped moisture.
Press lightly for softness or sagging areas, since damaged drywall or plaster can lose strength fast.
Watch for mold or a musty odor, because hidden water can stay active even after the visible leak stops.
Stain And Discoloration Signs
Even if the leak seems minor, ceiling stains often point to hidden water damage that’s already spreading behind the surface. You’ll usually notice color variations first: yellow rings, brown patches, or dark edges around a spot. Those marks can grow after each rain or plumbing cycle, so track changes with photos.
Look closely for paint deterioration, like bubbling, flaking, or a dull halo that separates from the ceiling finish. That tells you moisture’s been there long enough to weaken the coating.
- Check corners and seams.
- Compare stain size weekly.
- Note any musty odor.
- Mark fresh discoloration fast.
When you spot these signs, you’re not overreacting—you’re protecting your home and the people in it.
Softness And Sagging Areas
If the ceiling feels soft or sags under light pressure, moisture has likely weakened the drywall or plaster beneath the surface. You should treat any soft surface as a warning sign, not a cosmetic flaw.
Press gently with a finger or the palm of your hand; if it gives way, the ceiling may have lost structural integrity. Look for bowing, uneven edges, or areas that seem to dip between joists.
Don’t poke deeper, since that can widen the damage. Mark the area, keep people clear, and check the room above for the leak source.
If the sag worsens, call a qualified contractor quickly. Acting fast helps you protect your home and stay in control together.
Mold And Musty Odors
A musty smell or visible mold usually means water has been trapped long enough to affect materials behind the ceiling surface.
You need to treat musty smells as a warning sign, not a cosmetic issue. Check attic framing, insulation, and drywall edges for mold growth, staining, or damp spots. If the odor gets stronger after rain, hidden ceiling water damage is likely still active.
- Sniff near vents, seams, and light fixtures.
- Press lightly for cool, damp areas.
- Inspect with a flashlight for dark patches.
- Call a professional if mold spreads fast.
Act quickly, because moisture keeps feeding colonies and can spread into your home.
Dry the Ceiling Fast After a Leak
First, stop the water source so no more moisture gets into the ceiling.
Then open windows, run fans, and use a dehumidifier to increase air circulation and speed drying.
Keep the area ventilated until the ceiling feels dry and stable.
Stop The Water Source
Cut the water source immediately, then work to dry the ceiling as fast as possible.
Find your water shutoff first, and close it fully so the leak can’t keep feeding the damage. If the source isn’t obvious, call your building manager or plumber for help.
Next, schedule a plumbing inspection to confirm the line, valve, or fixture causing the problem.
- Check fixtures above the stain.
- Turn off nearby appliances and valves.
- Watch for new drips after shutoff.
- Document the damage for your team.
Stay calm and move fast; you’re protecting your space and everyone in it.
Once the flow stops, you can focus on cleanup without fighting fresh water.
Increase Air Circulation
Now that you’ve stopped the leak, get air moving right away so moisture doesn’t linger in the ceiling cavity. Open nearby windows and doors if outdoor humidity is lower, then run box fans to push moist air out and fresh air in.
Aim fans across the ceiling, not straight at wet insulation, so you improve air flow without spreading debris. If you have one, use a dehumidifier in the room and keep HVAC vents open to support drying.
These ventilation strategies work best when you keep the area clear and safe, so you and your household can stay out of the way while the space dries.
Check the ceiling daily for soft spots, dark staining, or new drips. If dampness stays after 24 to 48 hours, bring in a professional.
How to Find and Fix the Leak Source
Trace the stain to its source before you repair any drywall or paint. Start with leak detection in the attic, then check pipes, vents, and flashing. A plumbing inspection can reveal loose joints, slow drips, or failed supply lines above the ceiling.
Outside, do a roof examination for cracked shingles, clogged gutters, lifted flashing, and pooled water. Use these maintenance tips: look after storms, mark wet spots, and photograph changes so you can compare repairs.
- Feel around stains for cool moisture
- Run faucets and toilets one at a time
- Follow water tracks to the highest damage point
- Tighten small fittings and replace worn sealant
When you find the source, stop the water, dry the area, and patch the defect so your home stays solid together.
When to Call a Water Damage Pro
Call a water damage pro when the leak is active, the ceiling is sagging, or the damaged area keeps growing after you stop the source. You’re not overreacting; you’re protecting your home and your crew.
A pro can run a water damage assessment, check moisture levels, and trace hidden spread behind drywall and framing. They use leak detection methods like thermal imaging, moisture meters, and pressure testing to find what you can’t see.
Call sooner if the water has touched insulation, wiring, or HVAC parts, or if the area smells musty after drying attempts. The right technician helps you act fast, limit secondary damage, and keep your space safe, stable, and ready for the next step.
Repair Ceiling Damage: Stains, Sagging, and Cracks
Start ceiling repairs by matching the fix to the damage: clean and seal small stains after the area is fully dry, replace any wet or crumbling drywall, and cut out sagging sections before they fail.
For light discoloration, use staining solutions that block old water marks, then prime and repaint. If the ceiling feels soft, open the damaged area and do a clean patch.
For sagging repair, support the section, remove loose fasteners, and fit new drywall firmly to the framing. Seal hairline cracks with joint compound, tape wider ones, and sand smooth between coats.
- Check for soft spots with a light touch.
- Match patch size to the damage.
- Use dust control when you sand.
- Keep your tools ready and work in stages.
Prevent Future Ceiling Leak Damage
Once you’ve repaired the visible damage, focus on stopping the leak at its source so it doesn’t return. Check your roof, flashing, gutters, and attic after heavy rain, then schedule regular inspections before storm season.
Clear debris, seal gaps, and replace cracked caulk around vents, chimneys, and skylights.
Inside, watch for new stains, musty odors, or peeling paint, and act fast if you spot them. Keep humidity low with proper ventilation in bathrooms and kitchens, and insulate cold pipes to reduce condensation.
Make preventive maintenance part of your routine: tighten loose fixtures, test appliance hoses, and service HVAC drains.
You’re protecting your home, and you’re joining the group of owners who catch problems early and keep ceilings dry, sound, and safe.
Frequently Asked Questions
Can Ceiling Leak Damage Affect Electrical Wiring?
Yes—ceiling leaks can damage electrical wiring, creating shorts and shock hazards. You should prioritize electrical safety, shut off power to affected areas, and schedule a wiring inspection by a licensed electrician as soon as possible.
How Long Does It Take for Ceiling Stains to Appear?
Ceiling stains can appear in minutes or days; most show within 24 hours. You’ll see stain formation faster with active water absorption. Act quickly so you’re not alone facing hidden damage.
Will Homeowner’s Insurance Cover Ceiling Leak Repairs?
Usually, your homeowner’s insurance covers ceiling leak repairs if the leak’s sudden and accidental. Check your insurance policy, document damage, and start the claim process quickly. Exclusions often apply for wear, neglect, or slow leaks.
Can Mold Grow in a Ceiling After a Small Leak?
Yes—mold can grow after a small leak. You’re not alone: 1 in 3 homes has hidden moisture. Do a leak inspection fast, dry the area, and use mold prevention steps to stop growth.
Should I Move Furniture Before Checking a Leaking Ceiling?
Yes—you should move furniture first. Protect it with furniture protection like plastic or towels, then check the water source. You’ll reduce damage, stay organized, and join others who handle leaks quickly and confidently.
Wrap-Up
Ceiling leak damage can spread like a slow-burning fuse, so act fast. Stop the water, contain the drip, and dry the area before hidden damage takes root. Check for stains, sagging, and mold, and fix the source before you patch the surface. If the leak keeps feeding the problem, call a pro. Think of your ceiling as a shield—once it’s breached, every delay lets more trouble in.