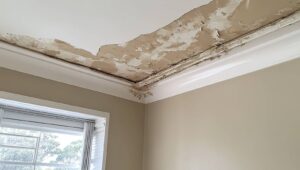
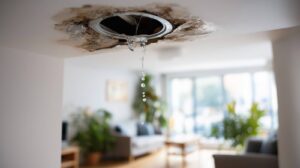
If you notice a ceiling stain, sag, or drip, you need to act fast before the damage spreads. Ceiling Leak Water Damage Repair may involve shutting off the water, protecting the room, and checking for hidden structural issues right away. Drying and mold control matter just as much as the repair itself. The real challenge is knowing which fixes you can handle and when the damage signals a bigger problem.
Key Takeaways
- Identify ceiling leak damage early by spotting stains, swelling, sagging, soft spots, and peeling paint.
- Stop the leak immediately by shutting off water and containing drips with buckets, tarps, and moved furniture.
- Dry the ceiling cavity thoroughly with fans and a dehumidifier to prevent mold growth.
- Remove damaged drywall or insulation, then clean, patch, and prime affected areas before repainting.
- Inspect the source, document damage, and repair quickly to avoid structural problems and higher costs.
How to Spot Ceiling Leak Water Damage Fast
When you inspect a ceiling for leak damage, look first for discoloration, swelling, and sagging, since these are often the earliest visible signs of water intrusion.
You’ll also want to check for soft spots, peeling paint, and hairline cracks around joints and fixtures.
In leak detection, trace the pattern of staining; irregular edges often indicate active or recent seepage.
For a quick moisture assessment, press gently with a dry hand or tool and note any spongy resistance or coolness.
You can also compare affected areas with adjacent ceiling sections to spot subtle changes.
If you belong to a team of homeowners handling repairs together, share clear observations and photos so everyone can judge the damage consistently and act with confidence.
Stop the Leak and Protect the Room
Shut off the water supply at the nearest valve or main line to stop the leak at its source.
Then place buckets, towels, or a tarp under the affected area to contain runoff and limit further damage.
Move furniture and electronics out of the leak zone so you can protect the room while you work.
Shut Off Water
Before you do anything else, stop the water source feeding the leak and protect the room below. You should shut off the nearest fixture valve first, then close the main water supply if the leak continues.
If the damage follows a bathroom, kitchen, or laundry line, inspect accessible shutoff points under sinks, behind toilets, and near appliances. Turn valves clockwise until they stop, and don’t force a stuck handle.
If you can’t isolate the water source quickly, shut off the main valve to prevent further intrusion. Once the flow stops, verify that dripping has slowed or ended.
This step keeps your home safer and helps your crew stay focused on repairs. Acting fast gives you control, reduces spread, and supports a cleaner recovery for everyone involved.
Contain The Damage
Place a bucket, tarp, or heavy-duty plastic sheet under the leak to catch drips and limit water spread.
You should move furniture, electronics, and rugs out of the affected zone, then cover anything that remains with waterproof protection.
If water is pooling, puncture a bulging ceiling area only if you can do so safely, and direct the flow into your container.
Use towels to build temporary barriers along baseboards and doorways, because containment strategies work best when you stop migration early.
Keep the room ventilated, and avoid running fans directly on wet insulation until you complete damage assessment.
You’re protecting your space and preserving evidence for repair decisions.
Mark stained areas, photograph damage, and stay alert for sagging drywall or electrical hazards.
Look for Hidden Ceiling Damage
Even if the visible stain seems small, inspect the surrounding ceiling for hidden damage such as softened drywall, sagging joints, bubbling paint, and hairline cracks.
You should trace hidden sources above the mark, including plumbing runs, HVAC lines, and roof penetrations, because moisture often travels before it shows. Use inspection techniques like gentle pressure, a flashlight at an angle, and close visual checks along seams and fasteners.
You’ll spot areas that feel spongy, bow inward, or discolor differently from intact material. If you belong to a team handling the repair, compare notes so everyone watches the same zone.
Mark suspicious boundaries with painter’s tape, then monitor them for change. That record helps you decide whether the ceiling needs further assessment from a qualified professional.
Dry Ceiling Leak Water Damage Completely
Once you’ve confirmed the leak source is stopped, dry the ceiling cavity completely so trapped moisture doesn’t keep damaging the material or promote mold growth.
Open access points, remove wet insulation, and run fans to move air through the cavity. Use a dehumidifier to pull moisture from the room and support even drying.
If you can, measure surface moisture until readings return to normal. Focus on joints, framing, and backing where water lingers longest.
Use drying techniques that match the material, and avoid sealing damp areas too soon. You can add temporary moisture barriers only after the structure is dry, so you don’t trap residual water.
Work methodically, and you’ll protect the repair zone and keep your home’s ceiling system ready for the next step.
Prevent Mold After a Ceiling Leak
After the ceiling cavity dries, you need to stop mold before it starts by removing any remaining damp materials and keeping the area below 60% relative humidity.
For reliable mold prevention, you should act like part of a careful repair team and verify each step:
- Inspect insulation, drywall, and wood for hidden moisture.
- Use dehumidifiers and fans for steady humidity control.
- Clean exposed framing with an approved antimicrobial cleaner.
- Monitor the space for 48–72 hours with a hygrometer.
If you detect musty odors or new condensation, repeat drying immediately.
Seal the area only after moisture readings stay stable.
This disciplined approach protects your home, supports the group of people who share the space, and lowers the chance that mold colonies will establish after the leak.
Repair Stains, Sagging, and Cracks
If the ceiling leak left stains, sagging drywall, or hairline cracks, you’ll need to repair the damaged surface before repainting.
Start with stain removal: clean the area, then apply a stain-blocking primer to prevent bleed-through.
If the drywall feels soft or bulges, cut out the weakened section and replace it with new board, or resecure it if the damage is minor.
For crack repair, open each crack slightly with a utility knife, remove loose material, and fill it with joint compound.
Feather the edges, let each coat dry fully, then sand smooth.
You’re restoring a clean, stable ceiling that blends with the room and helps your repair feel complete.
When to Call a Water Damage Pro
If you see visible structural damage such as bowed framing, cracked drywall, or displaced ceiling materials, you should call a water damage pro right away.
If moisture keeps returning after drying, or you detect ongoing dampness, staining, or musty odors, the leak likely extends beyond a simple surface repair.
A pro can assess hidden saturation, document the damage, and prevent further structural deterioration.
Visible Structural Damage
When ceiling damage goes beyond staining and starts showing sagging drywall, cracked plaster, bulging paint, or distorted framing, you likely need a water damage pro. You’re not just seeing cosmetic failure; you’re seeing compromised structural integrity that calls for controlled repair techniques.
Inspect the affected span for deflection or separation.
Stop loading the area with storage, fixtures, or foot traffic.
Document the damage so your contractor can assess scope accurately.
Get an expert to verify framing, fasteners, and substrate condition.
You’re safer when you act as part of a prepared home community, sharing a standard: don’t guess at hidden load issues.
A pro can isolate the source, stabilize the assembly, and restore the ceiling before failure spreads.
Persistent Moisture Signs
Moisture that keeps returning after you’ve patched the obvious leak usually means the problem isn’t solved, and that’s when you should call a water damage pro.
You may see faint staining, cool spots, peeling paint, or a musty odor that lingers after drying. Those signs point to trapped water above the ceiling or inside insulation, where hidden damage can spread.
A pro uses moisture detection tools to map wet areas, verify source control, and assess whether materials need removal. That step matters because persistent dampness can accelerate mold growth and weaken drywall, joists, and fasteners.
When you act quickly, you protect your home and join a community of owners who handle repairs before small leaks become costly failures.
Frequently Asked Questions
Can Ceiling Leak Damage Affect Electrical Wiring?
Yes, ceiling leaks can damage your wiring, creating shorts, corrosion, and fire risks. You should prioritize electrical safety, shut off power, and use leak detection to find the source before repairs begin.
How Much Does Ceiling Leak Repair Usually Cost?
You’ll usually pay $300-$1,500, though 1 in 4 leaks exceed $2,000. Your repair cost factors include damage extent and access. DIY repairs can trim labor, but you’ll need precise diagnostics and safe moisture control.
Does Homeowner’s Insurance Cover Ceiling Water Damage?
Usually, yes, your homeowner’s policy covers sudden ceiling water damage, but not neglect. You’ll need insurance coverage details, quick reporting, and solid leak prevention steps to protect your home and community.
Can a Small Leak Cause Long-Term Structural Problems?
Yes, you can. Even a small leak can slowly weaken framing, promote mold growth, and cause insulation damage. You should inspect, dry, and repair it quickly, because hidden moisture can compromise structural integrity over time.
How Long Should Ceiling Repairs Take After Drying?
You’ll usually need 1-3 days for minor ceiling repairs after drying, but larger damage can take a week or more. Your repair timeline depends on drying time, material replacement, and finish matching.
Final Thoughts
You can spot a small stain and ignore a collapsed ceiling, but that contrast is exactly why fast action matters. When you stop the leak, dry the area fully, and repair damage before mold spreads, you protect both the room and your budget. If you see sagging, cracking, or hidden moisture, don’t wait. Call a water damage pro when repairs go beyond surface fixes, and you’ll keep your home stronger, safer, and more stable.