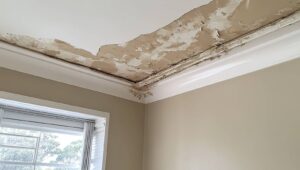
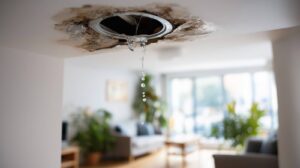
A Ceiling Leak can quickly lead to serious damage if you don’t act fast. When your ceiling starts leaking, you should cut power to any affected fixtures, contain the dripping water, and check for sagging, staining, or soft spots. Next, you’ll need to locate the source of the Ceiling Leak, remove wet or damaged materials, and thoroughly dry the ceiling cavity before mold has a chance to develop. The real challenge begins once the visible water is gone, as hidden moisture can continue causing damage if left untreated.
Key Takeaways
- Move people and valuables out of the area, place a bucket under the drip, and cut power to wet fixtures immediately.
- Look for brown stains, bubbling drywall, sagging spots, and musty odors to identify ceiling water damage quickly.
- Trace the leak source through the attic, plumbing, or HVAC drains, and document active moisture or fresh staining.
- Remove standing water, soaked insulation, and damaged drywall, then dry the area with fans and dehumidifiers.
- Call a water damage professional or electrician for serious leaks, electrical hazards, or signs of mold growth.
What to Do First When Your Ceiling Leaks
When you spot a ceiling leak, act fast: move people and valuables out of the area, place a bucket or other container under the drip, and cut power to any fixtures or outlets that may be getting wet.
Your immediate actions should stay focused on safety and control. If water is spreading, use towels or plastic sheeting to guide runoff away from walkways.
Document the location and time for your emergency checklist, then call the property manager, plumber, or roofer right away.
Don’t poke the ceiling or try to open it unless a professional tells you to. Stay nearby, monitor the leak, and keep others clear until help arrives.
Quick, calm steps help you protect your space and stay part of the solution.
Spot Water Damage Signs Fast
You can spot water damage fast by watching for the early warning signs above and below the leak: brown or yellow ceiling stains, peeling paint, bubbling drywall, sagging spots, damp insulation, and a musty odor.
Check for water stains that spread in uneven rings, since fresh moisture often looks darker at the edges. Notice ceiling discoloration that changes from faint tan to deep amber after each wetting cycle.
Touch nearby trim and drywall; cool, soft, or swollen areas signal active damage. Look under light fixtures, vents, and seams where moisture shows first.
If you live in a busy home, don’t ignore small changes—your household can catch these early and act together. Quick spotting helps you protect finishes, limit spread, and keep the space safer for everyone.
Find the Leak Source
Trace the visible water path from the ceiling stain back to the highest wet point, since the leak often starts above the damage.
Inspect attic framing, plumbing lines, HVAC condensate drains, and roof penetrations for active moisture or fresh staining.
If you can’t spot the source quickly, keep monitoring the path and isolate the area before the leak spreads.
Trace Visible Water Path
A leak rarely drips straight down from the failure point, so inspect the entire water path from the ceiling stain outward. You’ll map water stain patterns to see where moisture pooled, then follow the leak trajectory toward the highest wet edge.
Check discoloration gradients, swollen drywall, and darker rings; these clues show direction and timing. Use a flashlight at a low angle to reveal subtle ridges, drips, and tracks. Mark the stain boundary with painter’s tape so you can compare changes after a short wait.
If the path bends around framing or seams, note each turn; water often follows gravity, fasteners, and joints. Stay methodical, document what you see, and you’ll narrow the source with confidence before you open anything.
Inspect Above Ceiling Sources
With the water path mapped, inspect the space above the stain to pinpoint the source. You’ll use ceiling inspection techniques to check joists, pipes, vents, and roof penetrations.
Shine a light along framing and insulation, and feel for dampness, corrosion, or fresh drips. If you can safely access the attic or crawl space, follow the wet trail to its highest point; that’s often where the leak begins.
Hidden leak detection means looking beyond the obvious stain for slow failures in supply lines, flashing, or HVAC condensate. Stay methodical, and you’ll narrow the cause fast.
- Check plumbing joints
- Inspect roof decking
- Test nearby fixtures
- Mark active moisture
Remove Standing Water and Wet Materials
Start by removing any standing water as soon as it’s safe to do so, using a wet/dry vacuum, buckets, or absorbent towels.
Focus on water extraction from floors, trim, and contained ceiling drips before the load spreads. Work in sections so you can track what’s still saturated.
Pull out soaked insulation, damaged drywall, swollen baseboards, and any textiles that won’t recover. Place each item in heavy-duty bags for material disposal, and keep clean materials separate from contaminated debris.
Wear gloves and a mask, and shut off nearby power if moisture has reached fixtures. You’re protecting your space and your crew by acting fast, documenting what you remove, and clearing the area for the next repair step.
Dry Out the Ceiling and Cavities
Once you’ve cleared standing water and removed saturated materials, move on to drying the ceiling assembly and any hidden cavities.
Use targeted drying techniques: air movers across open seams, dehumidifiers nearby, and gentle heat only if you can monitor conditions. Keep airflow moving so trapped moisture doesn’t linger behind framing or finish layers.
Perform regular moisture assessment with a meter on joists, drywall edges, and adjacent trim until readings stabilize.
- Ventilate the room to reduce humid air
- Open access points where safe to improve circulation
- Check for cool spots that signal trapped moisture
- Document readings so you can track progress
You’re not rushing this step; you’re preventing secondary damage and staying in control with your crew.
Repair Drywall, Insulation, and Paint Damage
After the ceiling and cavities are fully dry, inspect the damaged area and replace any compromised drywall, wet insulation, or stained finish materials.
Cut back damaged board to solid edges, then install drywall replacement with matching thickness and secure fastening.
Choose insulation types that suit the cavity, and fit them snugly without compressing batts or leaving gaps in loose fill.
Tape, mud, and sand the seams so the patch blends cleanly with the surrounding ceiling.
Prime repaired surfaces before you repaint; this helps the finish bond evenly and hides moisture marks.
Match the existing sheen and color as closely as you can.
Work methodically, keep dust contained, and verify every repair feels solid before you move on.
Prevent Mold After a Ceiling Leak
With the drywall, insulation, and finish repairs complete, focus on stopping mold before it starts. You need fast moisture control to protect the area and keep your home safe for everyone in it.
Run fans and a dehumidifier until the ceiling cavity and adjacent surfaces feel dry. Check for damp spots daily, especially around seams, trim, and attic framing. Improve air movement so trapped humidity can’t settle.
For mold prevention, keep indoor humidity below 60% and fix any lingering drip or seep right away.
- Dry visible moisture immediately
- Ventilate the room well
- Monitor humidity with a gauge
- Inspect for soft, musty areas
Stay consistent for several days, because mold grows quickly on hidden wet materials.
When to Call a Water Damage Pro
If you see visible ceiling damage like sagging, staining, or a growing crack, call a water damage pro right away.
If water may have reached wiring, fixtures, or outlets, you need professional help to reduce electrical safety risks.
If you notice musty odors or spotting that suggests mold growth, you should bring in a pro before the damage spreads.
Visible Ceiling Damage
Sagging drywall, expanding stains, bubbling paint, or a damp, musty odor signal that ceiling water has moved beyond a simple patch-up. You should call a water damage pro when ceiling discoloration spreads, texture changes appear, or the surface feels soft under light pressure.
These signs usually mean moisture has soaked the finish, insulation, or framing above. A trained crew can trace the source, measure moisture, and start controlled drying before the damage widens.
- Watch for cracks that lengthen after drying
- Check for paint that blisters or separates
- Note any peeling tape at seams
- Compare the wet area to nearby dry sections
If you notice these changes, act fast. You’re not overreacting; you’re protecting your home and the people in it.
Electrical Safety Risks
Even a small ceiling leak can create an electrical hazard when water reaches light fixtures, junction boxes, or wiring above the drywall. You need to treat these electrical hazards as urgent, not minor.
If a fixture flickers, hums, trips a breaker, or feels warm, shut off power to that circuit at the panel and keep everyone out of the area. Don’t touch wet switches, outlets, or hanging fixtures.
Use safety precautions like wearing dry shoes, avoiding metal ladders, and never standing in pooled water near energized equipment. If the leak is near recessed lights, ceiling fans, or smoke alarms, call a water damage pro and a licensed electrician.
You protect your home best when you act fast, stay calm, and follow the same safety steps your neighbors would use.
Mold Growth Signs
Musty odors, dark spotting, and fuzzy growth around ceiling stains are early mold warnings, and they mean the leak has gone beyond a simple surface repair.
You need to treat these signs as a moisture problem, not a cosmetic blemish. Different mold types can colonize drywall, insulation, and wood within 24 to 48 hours, especially after repeated seepage. That growth raises health risks for you and anyone sharing the space, including irritation, coughing, and allergy flares.
- Call a pro if the stain spreads fast.
- Call a pro if you smell mildew after drying.
- Call a pro if the ceiling feels soft or warped.
- Call a pro if black, green, or white spots appear.
A water damage specialist can map moisture, remove contaminated materials, and help your home feel safe again.
Frequently Asked Questions
How Much Does Emergency Ceiling Leak Repair Usually Cost?
You’ll usually pay $150–$800 for emergency ceiling leak repair, depending on leak detection complexity, damage, and repair techniques. You’ll join a prepared crew quickly, and fast action often keeps costs from climbing.
Will My Homeowner’s Insurance Cover Ceiling Leak Damage?
Yes—your homeowner’s insurance may cover ceiling leak damage, like a shield against sudden storms. You’ll need to file insurance claims, and your payout depends on coverage limits, leak cause, and policy exclusions.
Can I Stay in the Room During Ceiling Leak Repairs?
You can stay only if the repair area’s secure and dry; otherwise, choose temporary living arrangements. Follow safety precautions: shut off power, ventilate, and avoid active leaks. Your contractor should confirm it’s safe before you re-enter.
How Long Does Ceiling Leak Repair Take to Complete?
You’ll usually finish it in 1–3 days, like a surgeon closing a clean wound. Your repair timeline depends on leak assessment results, drying, damage severity, and materials; you’ll know the schedule after inspection.
What Tools Are Needed for Minor Ceiling Leak Cleanup?
You’ll need a flashlight, moisture meter, bucket, towels, utility knife, fan, and PPE. Use leak detection first, then start the cleanup process. You’ll protect your space, limit damage, and keep the area safe.
Final Thoughts
Before the leak gets worse, act quickly. Responding early helps protect the room, reduce repair costs, and prevent mold from developing. If you notice stains, sagging, or active drips, follow the recommended steps to limit the damage, and contact a professional if the leak continues or the damage spreads.