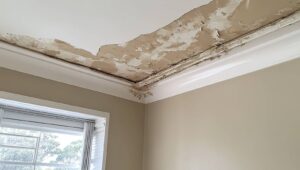
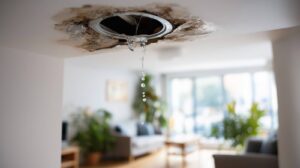
Ceiling Leak Repair should begin as soon as you spot a leak to prevent water from spreading, exposing electrical wiring, or causing drywall to fail. You’ll need to shut off the power if necessary, contain any runoff, trace the source of the leak above, and protect the room below from further damage. From there, you can remove damaged materials, treat any mold growth, and complete the Ceiling Leak Repair using the appropriate restoration method. The key is knowing which step comes first—and which one you can’t afford to skip.
Key Takeaways
- Shut off the water source and power immediately to stop damage and reduce electrical hazards.
- Contain leaks with buckets, towels, and temporary patches while documenting the damage for repair planning.
- Identify the leak source by inspecting above the ceiling, checking pipes, fixtures, insulation, and moisture signs.
- Remove damaged ceiling sections, dry the area thoroughly, and repair drywall or plaster with matching materials.
- Treat any mold quickly, discard heavily contaminated porous materials, and call a professional for sagging or structural damage.
Stop the Ceiling Leak Fast
If water is actively dripping from your ceiling, shut off the nearest water source immediately and move anything valuable out of the affected area.
Then inspect the stain’s edges, note the leak path, and use leak detection to trace moisture above the spot. You can place a bucket, towels, or plastic sheeting to control runoff while you work.
Apply temporary fixes only if you can reach the source safely: tighten loose fittings, clear a clogged drain, or patch a small gap with waterproof tape.
Don’t cut into drywall unless you’ve confirmed the leak’s location.
Keep the area dry to limit spread, and document what you see so you can explain the problem clearly to a plumber, roofer, or trusted maintenance neighbor.
Shut Off Water and Power if Needed
Before you do anything else, shut off the water supply that may be feeding the leak, and turn off power to the affected ceiling area if water could reach light fixtures, fans, or wiring. You’re protecting your home and everyone in it.
Keep a simple emergency plan so you and your household can act fast under pressure.
- Close the nearest water supply valve.
- Flip the correct breaker to off.
- Avoid wet switches and outlets.
- Use a flashlight, not overhead lights.
- Tell everyone to stay clear.
If you’re unsure which valve or breaker controls the area, use labels, your panel map, or the utility shutoff note in your emergency plan.
Acting together and staying calm helps your crew make safer decisions.
Find the Leak Source Above
With the water and power safely shut off, you can trace the source of the leak above the ceiling damage.
Start in the attic, crawlspace, or upper floor and inspect pipes, vents, and roof penetrations directly over the stain. Use leak detection methods like visual checks, moisture meters, and a flashlight to map wet paths and confirm active dripping.
Watch for common leak sources such as supply lines, drain fittings, HVAC condensate lines, damaged flashing, and failed shower pans.
Feel for damp insulation, corrosion, or mineral buildup, since these signs often point to the origin.
If the area is dry, run fixtures one at a time so you can isolate the exact source.
Stay systematic, and you’ll work like a pro with your crew.
Protect Furniture, Floors, and Belongings
Move nearby furniture, rugs, and electronics out of the leak zone, or cover them with waterproof tarps and plastic sheeting if relocation isn’t practical. Prioritize furniture protection and belongings safety by creating clear access paths and sealing vulnerable surfaces.
- Lift legs with wood blocks
- Wrap upholstered pieces tightly
- Use corner guards on sharp edges
- Tape seams so water can’t wick through
- Add absorbent pads under drips
Keep flooring isolated with plastic overlapped at the edges and weighted down. Protect cords, chargers, and paper items from splash exposure.
If you’re working with a trusted crew or family members, assign one person to monitor the coverings and replace wet materials fast. These steps limit secondary damage, preserve your space, and help you stay organized while repairs move forward.
Drain Standing Water Safely
Once you’ve protected the surrounding area, get rid of any pooled water right away so it doesn’t seep farther into the ceiling cavity, wall edges, or flooring.
Use a bucket, wet vacuum, or shallow pan to collect standing water, and work from the lowest point outward. If the leak is active, place a container directly under the source and keep checking it.
For larger amounts, you can punch a small drainage point only if the material is already sagging and unstable; otherwise, you risk spreading damage. Keep steady pressure and controlled drain techniques to avoid splashing.
Wear gloves and non-slip shoes, and move carefully on wet surfaces. In a well-prepared space, you’ll handle the cleanup faster and protect your crew’s shared work area.
Dry Ceiling Materials After a Leak
Check the ceiling for soft spots, staining, sagging, and mold to assess the moisture damage before you start drying.
Remove wet insulation or damaged drywall if it won’t dry reliably, then increase airflow with fans and a dehumidifier.
Keep the area ventilated and monitor the material until its moisture level returns to normal.
Assess Moisture Damage
Start by drying the ceiling materials as soon as the leak is controlled, because trapped moisture can weaken drywall, stain plaster, and support mold growth. Use moisture detection to map wet zones, then perform a damage assessment before you close anything up.
You’re looking for soft spots, sagging seams, discoloration, and peeling paint. Document findings so you and your contractor can agree on what needs removal or repair.
- Probe edges for hidden dampness
- Check insulation for saturation
- Inspect fasteners and joints
- Mark all affected areas
- Compare readings in dry and wet sections
If the ceiling feels unstable or smells musty, treat it as compromised. This careful review helps your repair team work with confidence and keeps your home’s structure safer for everyone inside.
Speed Up Drying
After you stop the leak, dry the ceiling materials immediately so trapped moisture doesn’t keep spreading damage. Open windows if weather allows, and use fans to create crossflow across wet drywall, plaster, and insulation.
Position a dehumidifier nearby to pull vapor from the air and keep relative humidity low. These air circulation techniques help your ceiling dry faster and reduce mold risk.
If insulation stays saturated, remove and replace it, because hidden moisture slows recovery. You can place moisture absorption materials, such as desiccant packs or absorbent pads, in access areas to support drying, but they’re not a substitute for ventilation.
Check the area daily with a moisture meter; when readings return to normal, you’re ready for repairs and reinstallation.
Remove Damaged Ceiling Sections
Inspect the ceiling for sagging, staining, soft spots, and cracked seams so you can define the full damaged area before you cut.
Use a utility knife or drywall saw to remove only the compromised sections, trimming back to solid framing or intact material.
Measure the opening, then prep replacement drywall or plaster board so it matches the removed section and installs cleanly.
Assess Ceiling Damage
Before you remove any ceiling material, confirm the leak has stopped and map the full extent of the damage by checking for sagging drywall, staining, soft spots, and active moisture.
Use ceiling inspection tips to stay systematic and protect your space and team. Follow this damage assessment checklist:
- Probe discolored areas for softness
- Trace water paths beyond the stain
- Note cracked seams and joint tape failure
- Check insulation for dampness
- Compare affected zones to nearby dry areas
You’re building a clear repair plan, so mark every compromised section with painter’s tape and document it with photos.
Keep your footing steady, your lighting bright, and your focus on boundaries between sound and damaged material.
When you assess carefully, you’ll know exactly what needs attention and you’ll work with confidence.
Cut Out Sections
Cut out only the damaged ceiling sections, using the taped boundaries and your moisture map as guides. You’ll work with controlled cutting techniques, keeping the blade shallow so you don’t nick joists, wiring, or sound material.
Use repair tools like a utility knife, drywall saw, and straightedge, and follow basic safety precautions: wear eye protection, a respirator, and gloves.
As you remove each piece, check material choices for the existing ceiling type so your patching methods stay compatible. If you’re dealing with plaster or other drywall alternatives, score carefully and lift in small sections.
Keep edges clean for tight seams, then note sealing options for the repair phase. Smooth, square cuts now make the finishing touches easier later, and they help your crew feel confident and connected.
Prep Replacement Material
Set your replacement material aside and trim it to match the opening only after you’ve confirmed the damaged ceiling sections are fully removed and the cavity is clean.
You’ll get a better fit when you measure twice and match the ceiling types before cutting. Inspect for hidden water damage, then dry the framing completely.
Use repair tools to square the edges, remove loose fasteners, and clear dust so the patch seats flush. Choose replacement materials that match thickness, texture, and fire rating, and keep them nearby as you work.
- Verify opening dimensions
- Check joist spacing
- Match board thickness
- Dry all surfaces
- Test-fit before fastening
Treat Mold After Ceiling Leaks
Once the leak is fixed and the area is dry, you should treat any visible mold immediately to prevent it from spreading and worsening indoor air quality.
Wear gloves, eye protection, and an N95 respirator, then isolate the affected zone so spores don’t travel.
For small patches on nonporous surfaces, scrub with detergent and water, then apply an EPA-registered fungicide or a 1:10 bleach solution if the surface allows it.
If the mold covers porous insulation or drywall, remove and discard that material safely.
Dry the space thoroughly with ventilation and dehumidification.
Your mold removal plan should also include prevention strategies: monitor humidity, fix future leaks fast, and inspect nearby framing regularly.
That helps you protect your home and stay confident in the repair.
Repair and Refinish the Ceiling
After the area is clean, dry, and mold-free, you can repair the damaged ceiling surface. You belong in this step-by-step finish work, and you can make the repair look seamless.
Scrape loose paint and weak joint compound.
Cut out soft drywall and fit a tight patch.
Apply setting compound in thin, even coats.
Feather edges with a wide knife, then sand smooth.
Match ceiling textures before priming and painting.
Prime the patched area to seal porosity and improve adhesion.
Then choose paint finishes that match the surrounding sheen, whether flat, eggshell, or matte.
Apply two light coats, letting each dry fully.
Use crisp masking and controlled roller pressure to avoid flashing.
With careful blending, your ceiling will read as one continuous surface.
When to Call a Water Damage Pro
If you see severe water stains, call a water damage pro because the leak may still be active and the ceiling materials can stay saturated.
If you notice mold or persistent odors, you need professional drying and remediation to stop hidden growth and contamination.
If the ceiling sags, cracks, or shows any structural damage signs, you shouldn’t wait, since the assembly may be unsafe.
Severe Water Stains
When ceiling water stains spread beyond a small yellow ring, darken quickly, sag, or keep returning after repairs, you’re likely dealing with active moisture intrusion that needs a water damage pro. You can’t treat this as simple stain removal when severe damage is advancing behind the surface.
Measure the stain’s diameter and track growth.
Press gently; soft drywall means hidden saturation.
Check nearby fixtures, roofs, and supply lines.
Shut off the water if the stain expands.
Call a pro if the ceiling bows or drips.
You’re not overreacting; you’re protecting your home and your people. A technician can locate the source, dry framing, and verify repairs before the ceiling fails.
Mold And Odors
Musty odors, earthy smells, or visible mold around a ceiling leak usually mean moisture has stayed trapped long enough for microbial growth to start.
You shouldn’t just repaint or deodorize; you need to stop the source, dry the area fast, and inspect hidden cavities for active contamination.
If the smell returns after ventilation, or if spotting spreads beyond the leak, call a water damage pro for targeted cleanup. They can remove affected materials, verify drying, and apply antimicrobial treatment for mold prevention.
This approach protects your indoor air and helps your household feel safe again.
For odor removal, don’t rely on perfumes or ozone alone; pair cleaning with full moisture control, because persistent smells usually signal remaining moisture, not just surface residue.
Structural Damage Signs
A ceiling leak that causes sagging drywall, bubbling paint, warped framing, or cracks that widen over time points to structural distress, not just a surface stain.
You should inspect for cracked plaster, peeling paint, warped drywall, and a sagging ceiling before damage spreads.
Look for discoloration patterns, musty smells, bubbling wallpaper, and stained insulation, because these signs often mean moisture has reached hidden materials.
If you notice any of the following, call a water damage pro fast:
- persistent sagging ceiling sections
- widening cracks in plaster
- peeling paint near seams
- warped drywall or framing
- stained insulation above the ceiling
Act quickly so you can protect your home, your repair budget, and the people who rely on you.
Frequently Asked Questions
How Long Does Ceiling Leak Repair Usually Take?
You’ll usually need a few hours to two days, depending on leak detection results and repair techniques. If damage is extensive, you’ll wait longer for drying, patching, and finishing, but you’re not alone.
Will My Homeowner’s Insurance Cover Ceiling Leak Damage?
Usually, yes—if the leak’s sudden and accidental. File an insurance claim after a leak assessment, and you’ll know fast. Like a trusted crew, your policy may cover repairs, but gradual damage often won’t.
Can I Stay Home During Ceiling Leak Repairs?
Yes, you can usually stay home during ceiling leak repairs if you maintain home safety and the repair process is contained. You’ll need clear access, ventilation, and temporary protection from dust, water, and power interruptions.
How Much Does Professional Ceiling Leak Repair Cost?
Professional ceiling leak repair usually costs $300–$1,500, depending on damage, access, and materials. You’ll save money by weighing cost factors and comparing DIY options, but you’ll want a qualified technician for lasting, reliable results.
What Tools Are Needed for a Small Ceiling Leak Repair?
You’ll need a flashlight, ladder, bucket, utility knife, putty knife, drywall patch, sealant, and moisture meter. For DIY methods, start with leak detection, trace staining, then isolate and repair the source before refinishing.
Recap
When you handle a ceiling leak quickly, you limit damage and cut repair costs. Many insured homes file a water damage claim each year, so fast action matters. Shut off water, protect your space, find the source, and remove damaged material before mold spreads. Then repair, refinish, and monitor the area closely. If the leak keeps returning or structural damage is visible, you should call a water damage professional right away.