When faced with a sewage backup, mold removal becomes vital to safeguard your health and property. You must act quickly and methodically, starting by evaluating the damage and ensuring safety precautions are in place. Understanding the right steps can greatly reduce the risks associated with mold growth. As you navigate this process, it’s important to know what to prioritize for effective remediation. What’s the first step you should take?
Key Takeaways
- Wear appropriate personal protective equipment (PPE) such as gloves, goggles, and masks to safeguard against contaminants during mold removal.
- Document the damage and mold presence thoroughly, including photographs and an inventory of affected materials for potential insurance claims.
- Remove and dispose of contaminated materials, such as carpets and drywall, following local hazardous waste disposal regulations to prevent further contamination.
- Use a HEPA filter vacuum to clean surfaces and apply disinfectants to thoroughly sanitize areas affected by mold growth after sewage backup.
- Implement moisture control measures, including dehumidifiers and proper ventilation, to prevent mold recurrence after cleanup is complete.
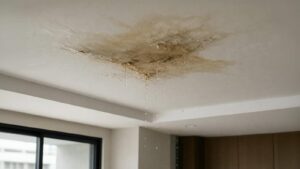
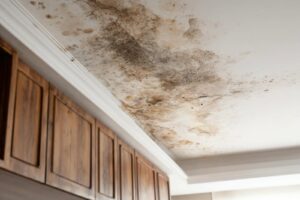
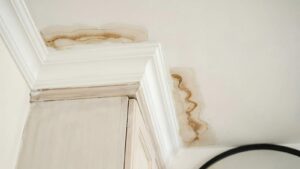
Assess the Damage
Before diving into mold removal, it’s vital to assess the damage thoroughly.
Begin by identifying the mold types present. Common varieties, such as black mold or mildew, can indicate different levels of severity. Use a flashlight to inspect hidden areas like behind drywall, under carpets, or in corners where moisture might linger.
Next, perform a damage assessment to understand the extent of the issue. Check for discoloration, water stains, or peeling paint, which can signal underlying problems.
Take note of the affected materials—wood, insulation, or drywall may require different removal methods.
Document your findings carefully, as this will guide your remediation process. It’s important to be detailed in your assessment to ensure you address all affected areas effectively.
Ensure Safety Precautions
As you prepare to tackle mold removal, ensuring safety precautions is essential to protect yourself and others.
Start by wearing personal protective equipment (PPE), including gloves, goggles, and a mask, to minimize exposure to harmful spores. Mold can release allergens and toxins that pose significant health risks, especially for those with respiratory conditions or weakened immune systems.
Make sure to work in a well-ventilated area; opening windows and using fans can help disperse any airborne contaminants. If the mold growth is extensive, consider using an N95 respirator for added protection.
Before you begin, remove any unnecessary items from the area to limit potential exposure and contamination.
By taking these precautions, you safeguard your health and create a safer environment for those around you.
Remove Contaminated Materials
To effectively tackle mold, you must remove contaminated materials promptly and thoroughly. Fungal growth can thrive on various surfaces, especially those that have been exposed to sewage.
Start by identifying and evaluating all affected materials, such as carpets, drywall, and insulation. If these items show signs of water damage or mold, they need to be disposed of immediately.
When it comes to material disposal, make sure you follow local regulations for hazardous waste. Seal contaminated items in plastic bags to prevent spores from spreading during removal.
It’s essential to work swiftly; the longer these materials remain, the higher the risk of further contamination. Engaging in proper disposal protects your space and promotes a healthier environment for you and your loved ones.
Clean and Disinfect Affected Areas
Once you’ve removed contaminated materials, it’s vital to clean and disinfect the affected areas to eliminate any lingering mold spores and prevent regrowth.
Effective cleaning techniques and disinfecting solutions are essential in this process. Here’s how to proceed:
Vacuum: Use a vacuum equipped with a HEPA filter to capture fine particles and mold spores from surfaces. Be thorough and pay attention to corners and crevices.
Scrub: Apply a suitable disinfecting solution to all hard surfaces, including walls and floors. Scrub vigorously with a brush to ensure you remove mold residues.
Rinse and Dry: After scrubbing, rinse the surfaces with clean water and dry them completely. Mold thrives in moisture, so make sure everything is thoroughly dried.
Use Proper Mold Removal Products
When tackling mold removal, it’s essential to choose biodegradable cleaners that are effective yet environmentally friendly.
Additionally, following safety guidelines ensures that you protect yourself and others during the cleaning process.
Selecting the right products can greatly enhance your mold removal efforts while minimizing health risks.
Choose Biodegradable Cleaners
Choosing biodegradable cleaners for mold removal safeguards your health and protects the environment. By opting for eco-friendly options, you contribute to a sustainable future while effectively tackling mold.
Here are three benefits of using biodegradable cleaners with natural ingredients:
Health Safety: They minimize exposure to harsh chemicals, reducing risks of respiratory issues and skin irritations.
Environmental Impact: Biodegradable cleaners break down naturally, causing less harm to ecosystems compared to conventional cleaners.
Effectiveness: Many eco-friendly options are specifically formulated to target mold, ensuring thorough removal without compromising safety.
Follow Safety Guidelines
Using biodegradable cleaners is a great start, but ensuring your safety during mold removal is equally important. Before you begin, gather essential safety equipment. This includes gloves, goggles, and a mask to protect yourself from harmful spores.
Personal protective gear is vital, especially when dealing with mold after a sewage backup.
Choose mold removal products that are specifically designed for this purpose; they often contain ingredients that target mold effectively while being safer for you and the environment. Always read the labels to confirm that the products meet safety standards.
Dry the Area Thoroughly
To effectively combat mold growth, drying the area thoroughly is essential. Proper drying techniques expedite the restoration process and play a vital role in mold prevention.
Here’s how you can achieve effective drying:
Use Fans: Position high-powered fans to circulate air throughout the affected area. This helps evaporate moisture quickly.
Dehumidifiers: Invest in dehumidifiers to reduce humidity levels. They draw moisture from the air, making it harder for mold to thrive.
Remove Wet Materials: Discard any saturated materials, such as carpets or drywall, that can’t be adequately dried. They often harbor mold spores and can exacerbate the problem.
Control Humidity Levels
Controlling humidity levels is essential in preventing mold growth in your home.
You should use dehumidifiers effectively to maintain ideal moisture levels, especially in damp areas.
Additionally, ensure proper ventilation in affected spaces to promote air circulation and reduce humidity.
Use Dehumidifiers Effectively
Maintaining ideal humidity levels is essential for effective mold removal, and dehumidifiers play an important role in this process.
To use them effectively for moisture control, follow these steps:
Adjust Your Dehumidifier Settings: Set your device to maintain humidity levels between 30-60%. This range is best for preventing mold growth.
Place Strategically: Position the dehumidifier in the most affected areas, ensuring it can circulate air freely.
Empty Regularly: Check and empty the water reservoir frequently to maintain efficiency. A full tank can hinder performance.
Ventilate Affected Areas
While mold thrives in damp, stagnant environments, proper ventilation can greatly reduce humidity levels and hinder its growth.
To effectively combat mold after a sewage backup, prioritize air circulation in affected areas. Open windows and doors to promote fresh airflow, and consider using fans to enhance moisture removal. This increased air movement helps evaporate excess moisture, creating an environment less conducive to mold proliferation.
If the weather permits, keep windows open as long as possible to facilitate continuous ventilation. Additionally, utilizing exhaust fans in bathrooms and kitchens can further control humidity levels.
Monitor for Recurrence
To effectively manage mold issues, you must monitor for recurrence after the initial removal process.
Even after thorough cleaning, mold growth can return if conditions are right. Implementing preventive measures is crucial for maintaining a mold-free environment.
Here are three strategies to keep in mind:
Regular Inspections: Check affected areas weekly for any signs of mold or moisture. Early detection can save you from bigger problems later.
Control Humidity: Keep indoor humidity levels below 60% using dehumidifiers or air conditioning. This makes it harder for mold to thrive.
Maintain Proper Ventilation: Confirm that your home is well-ventilated, especially in moisture-prone areas like bathrooms and kitchens. This helps reduce the likelihood of mold recurrence.
Seek Professional Help if Necessary
If you find that mold persists despite your best efforts, seeking professional help is a prudent step. Mold specialists possess the expertise and tools necessary to identify hidden mold and ensure thorough removal. They can assess the extent of the contamination and implement effective restoration services tailored to your situation.
Attempting to tackle extensive mold issues on your own can lead to further problems, including health risks and structural damage. Professionals address visible mold and prevent future outbreaks by addressing underlying moisture sources. Their experience allows them to navigate the complexities of mold removal safely and effectively, ensuring a healthier environment for you and your loved ones.
Ultimately, reaching out to mold specialists can provide peace of mind, knowing that you’re taking the right steps to restore your home. Don’t hesitate to seek help; it’s an essential part of the recovery process.
Document the Process for Insurance Claims
When dealing with mold removal, it’s essential to document the entire process for potential insurance claims.
Capture before and after photos, keep all receipts and invoices, and thoroughly document any damages.
This detailed record will strengthen your claim and ensure you receive the compensation you’re entitled to.
Capture Before and After
Documenting the mold removal process is essential, especially for insurance claims, as it provides clear evidence of the extent of damage and the steps taken for remediation.
Capturing before-and-after images illustrates the effectiveness of your efforts and also supports your claim during the insurance process.
Here’s how to do it effectively:
Before Images: Take detailed pictures of the affected areas, focusing on visible mold and water damage.
During Cleanup: Document each step of the remediation process, including any equipment used and materials removed.
After Cleanup: Capture images of the restored areas, highlighting improvements and ensuring your efforts are well-documented.
These images create an extensive record, making it easier to navigate your insurance claim.
Keep Receipts and Invoices
Capturing before and after images is just one part of the mold removal documentation process.
To strengthen your insurance claim, effective receipt management and invoice tracking are essential. Keep all receipts and invoices related to mold removal services, materials, and any repairs made. This documentation helps validate your expenses and demonstrates the seriousness of the situation to your insurance provider.
Organize these documents systematically, perhaps in a dedicated folder or digital file, to make retrieval easy. If you engage professionals, make sure you ask for detailed invoices that outline the services provided.
This thorough approach will enhance your claim and provide peace of mind, knowing you’re prepared for any potential discussions with your insurance company.
Document Damages Thoroughly
Thoroughly documenting damages is essential for a successful insurance claim, as it provides clear evidence of the extent of the mold issue.
To ensure a thorough damage assessment, follow these steps:
Photograph Mold Growth: Capture clear images of all affected areas, including walls, ceilings, and personal belongings.
List Damaged Items: Create a detailed inventory of items irreparably harmed by mold, including their purchase dates and values.
Record Cleanup Efforts: Document any remediation steps you’ve taken, including professional services hired and materials used.
Frequently Asked Questions
How Do I Identify Mold Growth After Sewage Backup?
To identify mold growth after sewage backup, look for discoloration on walls or ceilings, musty odors, and moisture. Use mold identification techniques like visual inspections and moisture meters to confirm sewage backup signs and assess damage thoroughly.
Can I Remove Mold Myself if I’m Allergic?
Yes, you can remove mold yourself, but if you have mold allergy symptoms, be cautious. Use safe removal techniques like wearing masks and gloves, ensuring proper ventilation, and considering professional help if symptoms worsen.
What Should I Do With Personal Items Affected by Mold?
You should assess personal items for mold damage. If they’re severely affected, consider disposal. For salvageable items, explore mold remediation options to clean and restore them while ensuring your health and safety remain a priority.
How Long Does It Take for Mold to Grow After Water Damage?
Mold growth can begin within 24 to 48 hours after water damage, depending on various factors like humidity, temperature, and the materials affected. Addressing these factors promptly can greatly impact the mold growth timeline.
Will My Homeowner’s Insurance Cover Mold Remediation Costs?
Your homeowner’s insurance might cover mold remediation costs, but it depends on your policy. Check for specific clauses regarding water damage and mold; understanding your coverage could save you significant expenses down the line.
Review
In the aftermath of a sewage backup, addressing mold is like tending to a wilting plant; neglecting it can lead to decay. By following the steps outlined, you can remove mold while also nurturing a healthier environment. Think of each action as a drop of water, reviving your space and preventing the roots of future issues. Stay vigilant, and don’t hesitate to seek help when needed, ensuring your home flourishes free from the shadows of mold.