When faced with flood damage, it’s essential to follow a systematic approach for cleanup. From evaluating the situation to removing standing water, each step plays an important role in restoring your space and ensuring safety. Understanding these steps can make all the difference as you navigate the complexities of flood recovery. Let’s explore what you need to do next.
Key Takeaways
- Assess the situation for hazards, ensure everyone’s safety, and wear protective gear before entering affected areas.
- Remove standing water using pumps and vacuums, and enhance ventilation to aid drying.
- Remove damaged materials like drywall and flooring, categorizing them for proper disposal and documenting the damage.
- Clean and sanitize affected areas thoroughly with appropriate products, ensuring complete drying to prevent mold growth.
- Maintain gutters regularly to prevent future flooding, ensuring they are free of debris and directing water away from the foundation.
Assess the Situation and Ensure Safety
When you’re faced with the aftermath of a flood, it’s essential to assess the situation immediately to secure everyone’s safety.
Begin with a thorough risk assessment to identify any hazards—like unstable structures, exposed electrical wires, or contaminated water. Confirm that everyone in your household is accounted for and safe.
Next, implement necessary safety precautions. Wear protective gear, such as boots and gloves, before entering affected areas. Avoid standing water, as it may conceal dangers like sharp objects or electrical shock risks.
Communicate with your family and neighbors, fostering a sense of community and support during this challenging time.
Sharing information about resources and safety measures can create a collaborative approach to recovery.
Remove Standing Water
To effectively begin the flood damage cleanup process, your first priority should be to remove standing water from the affected areas.
Standing water poses significant hazards, including the risk of mold growth and structural damage.
Here are some effective water removal techniques to evaluate:
- Use a submersible pump to quickly extract large volumes of water.
- Employ a wet/dry vacuum for smaller areas or remaining puddles.
- Open windows and doors to enhance ventilation and aid in drying.
- Wear protective gear, such as gloves and boots, to safeguard against contaminants.
Dry Out Affected Areas
Once standing water is removed, drying out affected areas becomes imperative to prevent further damage and the growth of mold.
Start by using a dehumidifier to control moisture levels in your space. Set it to a lower humidity level, ideally between 30-60%, and let it run continuously.
Open windows and doors to increase airflow, but only if it’s safe outside.
Use fans strategically to enhance airflow, directing them towards damp surfaces. Pay close attention to corners, under furniture, and other hidden areas where moisture can linger.
Regularly check the humidity levels with a hygrometer to verify moisture control is effective.
Remove Damaged Materials
Begin by evaluating the extent of damage to your materials, as prompt removal is essential for preventing further issues.
Start with your most affected items, using effective removal techniques to ensure safety. Carefully assess each material, focusing on those that can’t be salvaged.
Prioritize items like drywall, insulation, and flooring that are saturated.
Wear proper safety gear, such as gloves and masks, during the removal process.
Separate materials into categories for proper material disposal—recyclables, hazardous waste, and regular trash.
Document the damage for insurance claims, taking photos of affected areas.
Clean and Sanitize
After removing damaged materials, the next step involves cleaning and sanitizing the affected areas to eliminate contaminants and prevent mold growth.
You’ll want to start by using effective cleaning techniques tailored to the specific surfaces and materials in your home. Begin with a thorough rinse of the area to remove any remaining debris.
Then, apply sanitization products that are safe for your environment; look for those specifically designed for flood-damaged areas.
Remember to follow the manufacturer’s instructions for these products to ensure maximum effectiveness.
Don’t forget to wear protective gear, such as gloves and masks, during this process to safeguard your health.
Once you’ve cleaned and sanitized, allow the area to dry completely. This step is essential in fostering a safe, healthy living space after the disaster.
Taking these measures protects your home and helps you regain a sense of belonging and stability.
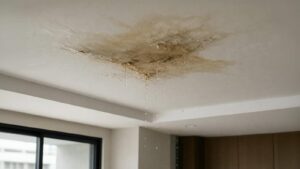
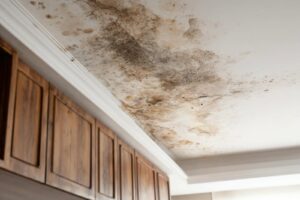
Inspect for Mold Growth
As you assess the cleaned areas, it’s essential to inspect for mold growth, since this can develop rapidly in damp conditions following a flood.
Mold can pose health risks and damage your property, so taking swift action is vital.
- Look for visible signs of mold, such as dark spots or fuzzy patches.
- Check hidden areas like behind walls, under carpets, or in insulation.
- Use mold testing methods, like air sampling or surface testing, to identify potential problems.
- Implement mold prevention strategies, including improving ventilation and reducing humidity.
Restore and Repair
After addressing mold growth, it’s essential to assess any structural damage to your property.
You’ll need to evaluate the integrity of walls, floors, and foundations, ensuring they can safely support repairs.
Once you’ve identified the issues, you can begin the mold remediation process and repair or replace any water-damaged materials as necessary.
Assessing Structural Damage
When evaluating structural damage after a flood, it’s essential to approach the situation methodically to ensure safety and effectiveness in restoration.
Start with a thorough damage assessment to understand the extent of the impact on your property’s structural integrity.
Consider these key aspects:
- Inspect walls and ceilings for cracks or sagging.
- Check the foundation for signs of shifting or settling.
- Evaluate the roof for leaks or structural weakness.
- Look for warped floors or buckling surfaces.
Mold Remediation Process
Once you’ve assessed the structural damage, tackling mold remediation is essential to restore a safe living environment.
Begin by containing the affected area to prevent spores from spreading. Use fans and dehumidifiers to reduce moisture levels, improving indoor air quality.
Carefully remove contaminated materials, ensuring you wear protective gear. Clean surfaces with a mixture of water and detergent, then apply a mold inhibitor.
Implement mold prevention techniques, such as fixing leaks and improving ventilation, to guard against future growth. Regularly monitor the area to ensure mold doesn’t return.
Repairing Water-Damaged Materials
As you begin the process of repairing water-damaged materials, it’s crucial to assess the extent of the damage before taking action.
Understanding how water damage affects different materials helps you choose the right restoration techniques.
Here are some key steps to follow:
Remove Excess Water: Use pumps or wet vacs to eliminate standing water quickly.
Dry the Area: Employ dehumidifiers and fans to ensure everything is thoroughly dried.
Inspect Materials: Check for rot, mold, or structural damage in wood, drywall, and insulation.
Replace or Repair: Decide whether to repair or replace damaged materials based on the assessment.
Prevent Future Flooding
To prevent future flooding, it’s vital to install effective drainage systems around your property.
Regularly maintaining your gutters will ensure they function properly, directing water away from your home.
Install Drainage Systems
Installing drainage systems is essential for preventing future flooding, especially after experiencing the aftermath of water damage.
By implementing effective drainage solutions, you can protect your home and peace of mind. Here’s what you should consider:
Evaluate your property layout: Identify low areas where water tends to pool.
Choose the right drainage type: Options include French drains, sump pumps, or surface drains.
Ascertain proper grading: Make sure the ground slopes away from your home.
Consult professionals: If you’re unsure, hiring experts can ensure effective installation.
Taking these steps mitigates flooding risks and fosters a sense of safety and security in your living environment.
You’re not alone in this journey; many have faced similar challenges and found solutions.
Maintain Gutters Regularly
Regular maintenance of your gutters is essential if you want to prevent future flooding around your home. Clogged gutters can’t direct rainwater away effectively, leading to potential overflows that may damage your foundation.
To ensure proper gutter function, commit to seasonal cleaning, ideally in the spring and fall. Remove leaves, twigs, and debris, and inspect for any signs of wear or leaks.
Consider installing gutter guards to minimize buildup and make the maintenance process easier. It’s also wise to check downspouts to make certain they’re clear and directing water away from your foundation.
Frequently Asked Questions
How Long Does the Flood Damage Cleanup Process Typically Take?
The cleanup timeline for flood damage typically varies. Still, you can expect the process duration to take anywhere from a few days to several weeks, depending on the extent of the damage and necessary repairs.
What Personal Protective Equipment Is Needed During Cleanup?
Nearly 30% of flood-related injuries occur during cleanup. You’ll need protective gear like gloves, masks, and boots to follow safety protocols. Remember, prioritizing your safety ensures you can help others effectively during this challenging time.
Can I File an Insurance Claim for Flood Damage?
Yes, you can file a flood insurance claim. Start the claim process by documenting damage, contacting your insurer promptly, and submitting necessary paperwork. This ensures you receive the support you need during this challenging time.
What Should I Do With Contaminated Items?
About 30% of flood-damaged items can be contaminated. For contaminated items, follow proper disposal methods like hazardous waste centers or local guidelines. Always prioritize safety and mental well-being as you navigate this challenging process.
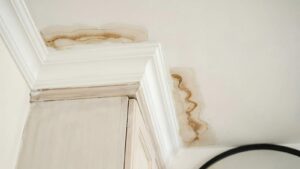
How Can I Identify Hidden Water Damage?
You can identify hidden water damage by conducting a moisture assessment using specialized water detection tools. Look for signs like discoloration, peeling paint, or a musty smell, as they often indicate underlying moisture issues needing attention.
Recap
Tackling flood damage may feel overwhelming, but following these steps will help you regain control of your space and peace of mind. By ensuring safety, removing water, and addressing damage methodically, you can restore your home to its former glory. Remember, the aftermath of a flood can feel like an endless battle, but with diligence and care, you can emerge victorious. Don’t forget to take preventive measures to safeguard against future floods—your home deserves it.