When dealing with toilet overflow water damage, it’s important to follow a structured approach to minimize further complications. Start by evaluating the damage to understand the extent of the issue. Next, you’ll need to turn off the water supply to halt any ongoing flooding. After that, removing standing water becomes necessary to prevent mold growth. Each step is critical, but knowing how to proceed effectively can make all the difference in your repair efforts.
Key Takeaways
- First, assess and document the damage by identifying the water source, inspecting affected areas, and taking photos for insurance claims.
- Next, turn off the water supply by locating the toilet’s valve and turning it clockwise to prevent further leakage.
- Remove standing water using a wet/dry vacuum or buckets, while wearing protective gear to avoid exposure to contaminants.
- Disinfect affected surfaces with appropriate cleaning solutions, scrubbing thoroughly, and allowing the solution to dwell before rinsing.
- Finally, repair damaged areas with moisture-resistant materials and consider seeking professional assistance for comprehensive restoration.
Assessing the Damage
When a toilet overflows, the first step is to assess the damage to prevent further issues.
Begin by identifying the water source—determine if it’s clean or contaminated. Carefully inspect the area around the toilet for signs of water pooling or saturation, as this can indicate the extent of the overflow. Use absorbent materials to soak up any excess water, but be cautious not to overlook hidden moisture that could lead to mold growth.
Next, evaluate your flooring and surrounding fixtures; water damage can affect the toilet, and adjacent areas like walls and cabinetry.
Document any visible damage with photos, as this will aid in future repairs or insurance claims. A thorough damage assessment helps you understand the immediate situation and prepares you for the next steps in the repair process, ensuring your home’s safety and integrity.
Turning Off the Water Supply
To stop the overflow immediately, locate the toilet’s water supply valve—typically found on the wall behind the toilet or near the floor.
Once you find it, turn the valve clockwise. This action shuts off the water supply, effectively activating the emergency shutoff. You’ll hear a noticeable change in the flow, indicating that you’ve successfully halted any further water from entering the toilet tank.
If the valve is stuck or difficult to turn, you might need to use a pair of pliers for leverage, but be cautious not to damage the valve.
After shutting it off, double-check that no additional water is spilling from the tank or bowl. This step is essential for preventing further water damage and protecting your home.
Removing Standing Water
With the water supply successfully turned off, it’s time to tackle the standing water in the toilet bowl and surrounding area.
Start by using a wet/dry vacuum for effective standing water removal. If you don’t have one, you can also use buckets or towels, but they’ll be less efficient. Carefully siphon out the water from the bowl, ensuring you avoid any spills.
For larger spills or flooded areas, employ water extraction techniques like a submersible pump, if available. Work systematically, moving from the edges toward the center, so you don’t miss any spots.
Remember to wear protective gear, including gloves and boots, as this area can harbor harmful bacteria.
After you’ve removed the bulk of the water, soak up any remaining moisture with towels. This methodical approach helps prevent further damage and prepares you for the next steps in restoring your space.
Disinfecting the Affected Area
After removing the standing water, it’s crucial to disinfect the affected area to eliminate harmful bacteria and prevent mold growth.
Start by selecting effective cleaning solutions, specifically designed to combat pathogens. A mixture of bleach and water is often recommended, but be certain you follow product instructions for safety and effectiveness.
Next, apply your chosen solution generously to surfaces, particularly around the toilet and any nearby flooring. Use a scrub brush to penetrate crevices and remove any lingering contaminants.
Once you’ve scrubbed the area, let the cleaning solution sit for the recommended dwell time to maximize its disinfecting properties.
Afterward, rinse the surfaces thoroughly with clean water to remove any residue.
Employ sanitization techniques, such as using a steam cleaner, to ensure complete disinfection. This step protects your health and fosters a safe environment, showing your commitment to maintaining a clean and welcoming space.
Drying and Dehumidifying
Once you’ve disinfected the affected area, focus on drying and dehumidifying the space to prevent further issues like mold and mildew growth.
Start by using effective drying techniques such as towels, mops, or a wet/dry vacuum to remove excess water. Make sure to target all surfaces, including floors and walls, since moisture can linger in hidden spots.
Next, set up a dehumidifier in the room. Dehumidifier usage is essential in controlling humidity levels, which should ideally be below 60%.
Monitor the device regularly, emptying the reservoir as needed. Keep windows and doors closed to maximize the dehumidifier’s efficiency. If possible, use fans to enhance air circulation, helping to speed up the drying process.
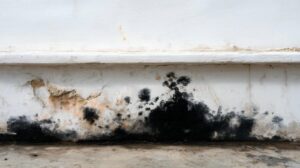
Inspecting for Mold Growth
As you assess the area for potential mold growth, it’s essential to conduct a thorough inspection of all surfaces and materials that came into contact with water.
Start by checking walls, floors, and any hidden spaces like behind toilets or cabinets. Look for discoloration, a musty smell, or visible mold patches, which may indicate a problem.
Next, consider using mold testing kits to determine if mold spores are present in the air or on surfaces. This can provide valuable insight into the extent of contamination.
Additionally, measure moisture levels using a moisture meter. High readings can signal the potential for mold growth, even if it’s not immediately visible.
Repairing Damaged Surfaces
Once you’ve identified the affected areas from the overflow, it’s essential to assess the extent of the damage.
Carefully evaluate surfaces for any signs of warping, discoloration, or structural issues.
After this assessment, you’ll need to select appropriate repair materials that match the type of surface you’re working with to ensure a seamless restoration.
Assessing Affected Areas
Evaluating the affected areas after a toilet overflow is essential for effective repairs. Start by identifying the water source and tracing its path.
Look for visible signs of damage, such as discoloration, warping, or mold growth on walls, floors, and ceilings. Conduct a thorough damage assessment by checking adjacent rooms, as water can travel unexpectedly.
Use moisture meters to determine the extent of saturation in materials like drywall and wood. Pay attention to hidden areas, such as beneath cabinets or behind appliances, where damage mightn’t be immediately visible.
Document your findings meticulously, as this information will guide your repair strategy. Remember, addressing all affected surfaces now will ensure a more durable and lasting repair outcome.
Selecting Repair Materials
After evaluating the affected areas, it’s time to focus on selecting the right repair materials for restoring damaged surfaces.
Begin with reviewing the type of surface—drywall, flooring, or cabinetry—affected by the overflow. For drywall, use moisture-resistant materials to prevent mold growth. If you’re repairing flooring, choose a water-resistant option that matches the existing style.
When it comes to cabinetry, opt for materials that can withstand humidity and are easy to clean. Always prioritize quality over cost; investing in durable repair materials ensures longevity.
Don’t forget to contemplate color and texture for a seamless finish. Your careful material selection will restore function and enhance the overall aesthetic of your space.
Preventing Future Incidents
While it’s tempting to overlook minor issues, addressing them promptly can greatly reduce the likelihood of future toilet overflow incidents.
Start by implementing preventive measures, such as checking the flapper valve and fill valve for wear and tear. Regular maintenance is key; inspect your toilet monthly for leaks and verify that the water level in the tank is appropriate.
Don’t forget to clear any clogs in the toilet or pipes immediately to prevent backups. Consider using enzyme-based cleaners to maintain clear drainage and avoid harsh chemicals that could damage plumbing.
Keep an eye on the toilet’s functioning—if you notice unusual noises or constant running, investigate these signs.
Educating your household on proper toilet use can prevent unnecessary strain on your plumbing. By taking these proactive steps, you’ll enhance your toilet’s longevity and foster a sense of security within your home.
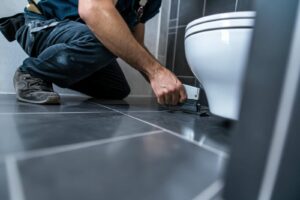
Contacting Professionals
When you encounter a toilet overflow that exceeds your DIY capabilities, contacting professionals becomes essential.
Start by finding reliable repair services that have a solid reputation for addressing similar issues.
Once you’ve identified potential contractors, assess the damage and obtain cost estimates to make an informed decision.
Finding Reliable Repair Services
How can you ensure you’re contacting the right professionals for toilet overflow repairs? Start by researching local repair service options.
Look for companies that specialize in water damage restoration and have a solid reputation. Check online reviews and ratings to assess their credibility.
Next, inquire about their qualifications. You want to confirm they employ qualified technicians with experience in handling toilet overflow situations specifically. Don’t hesitate to ask for certifications and past project examples.
Finally, consider reaching out for quotes to compare services and responsiveness. A reliable repair service will offer clear communication and detailed plans for your situation, giving you peace of mind while confirming that your home is in capable hands.
Assessing Damage and Costs
Evaluating the damage caused by a toilet overflow is essential before contacting professionals for repairs.
Begin your damage evaluation by inspecting affected areas, including floors, walls, and any furnishings. Take note of stains, warping, or mold growth, as these will impact your cost estimation. Document the severity and extent of the damage, as this information is vital when discussing repairs with experts.
Don’t forget to check for hidden issues, like water behind walls or under flooring, which can escalate repair costs if overlooked.
Once you’ve gathered this information, reach out to reliable professionals. They’ll use your assessment to provide accurate estimates, ensuring you’re informed and prepared for the repairs ahead.
Documenting the Damage for Insurance
Documenting the damage from a toilet overflow is essential for securing insurance compensation. Start by gathering evidence of the affected areas.
Take clear photographs of the damage, capturing different angles and details, such as water stains, warped flooring, and damaged drywall. Don’t forget to document expenses, including repair costs, replacement items, and any temporary accommodations. Keep receipts and invoices organized; this will strengthen your claim.
Next, create a detailed list outlining the damage and associated costs. Be methodical and thorough, noting specific items and their values. If possible, obtain estimates from professionals for necessary repairs.
Finally, compile all your documentation into a cohesive format for your insurance claim. This organized approach helps in filing your claim and fosters a sense of belonging within the community of homeowners who’ve faced similar challenges.
Frequently Asked Questions
How Can I Tell if My Toilet Is About to Overflow?
You can tell if your toilet’s about to overflow by watching for overflow signs like slow drainage, gurgling sounds, or water rising in the bowl. Regular toilet maintenance helps prevent these issues from escalating.
What Should I Do if the Water Supply Valve Is Stuck?
If your water supply valve is stuck, first check for corrosion or debris. Try gently tapping around the valve to dislodge it. If it’s still malfunctioning, consider replacing it to ensure proper functionality.
Can I Use a Wet Vacuum for Removing Toilet Overflow Water?
Yes, you can use a wet vacuum to remove toilet overflow water effectively. Just make certain you’re wearing protective gear and follow the vacuum’s instructions carefully to avoid any additional damage or health risks.
How Long Does It Take for Water Damage to Show Up?
Water damage can show up within hours, but detection methods might reveal it over days or weeks. You’ll want to stay vigilant, as early identification can prevent costly repairs and further complications down the line.
Will My Homeowner’s Insurance Cover Toilet Overflow Damage?
Yes, your homeowner’s insurance might cover toilet overflow damage, but it depends on your specific insurance policies and coverage limits. Review your policy details to understand what’s included and any potential exclusions that could apply.
Review
In the aftermath of a toilet overflow, every moment counts. By swiftly evaluating the damage and turning off the water supply, you’ve taken vital steps to mitigate further issues. But the real test lies in thoroughly removing standing water and disinfecting every affected surface. Don’t overlook the importance of drying and dehumidifying—this could mean the difference between a simple fix and a mold nightmare. Stay vigilant, and remember: the longer you wait, the more costly the repairs could become.