After a flood, mold cleanup is critical to protect your health and property. You need to assess the mold damage and identify affected areas promptly. Wearing the right safety gear is essential to avoid exposure to harmful spores. It’s important to act quickly, removing standing water within 24 to 48 hours. Understanding the steps for effective cleanup can make a significant difference, especially when it comes to long-term prevention. Let’s explore the essential tips you need to follow.
Key Takeaways
- Conduct a thorough assessment of affected areas to identify moisture sources and document findings for reference.
- Remove standing water within 24 to 48 hours using wet/dry vacuums or pumps to prevent mold growth.
- Clean and disinfect all surfaces with water and detergent, followed by an effective mold disinfectant.
- Bag and dispose of contaminated materials safely, adhering to local disposal regulations and using protective gear.
- Regularly inspect for mold signs and employ mold inhibitors to prevent future infestations in moisture-prone areas.
Assess the Damage and Identify Affected Areas
Before diving into mold cleanup, you need to assess the damage and identify the affected areas. Start with a thorough water damage assessment; inspect walls, ceilings, and floors for signs of moisture. Note any discoloration, warping, or peeling paint, as these can indicate mold-friendly conditions.
Identify sources of water intrusion—leaks, flooding, or humidity—and address these issues promptly to prevent future mold growth.
Next, check hidden spaces like behind appliances and inside cabinets. Use a moisture meter to detect dampness, ensuring you don’t overlook any areas.
Document your findings with photos and notes, creating an extensive report that aids in the cleanup process.
Ensure Proper Safety Gear Is Worn
Before starting mold cleanup, you must wear essential protective equipment, including gloves, goggles, and an N95 respirator.
This gear minimizes your exposure to harmful spores and reduces health risks associated with mold exposure.
Always prioritize your safety to ensure a successful and secure cleanup process.
Essential Protective Equipment
When tackling mold damage cleanup, wearing the right protective equipment is crucial for your safety. Start with a high-quality respirator equipped with a HEPA filter to prevent inhaling mold spores.
Next, make sure you wear protective goggles to shield your eyes from irritants. Long-sleeved shirts, gloves, and pants made from non-porous materials will protect your skin from direct contact with mold and moisture.
You should also consider waterproof boots for added protection against damp surfaces. Following these safety guidelines safeguards your health and fosters a sense of community as you work together with others who prioritize safety.
Health Risks Awareness
As you engage in mold damage cleanup, it’s vital to understand the health risks associated with mold exposure, particularly if proper safety gear isn’t worn.
Mold can trigger a variety of health effects, including respiratory issues, skin irritation, and allergic reactions. Wearing a mask, goggles, and gloves is essential to minimize these risks. Remember, even short-term exposure can lead to long-lasting health concerns.
To protect yourself effectively, incorporate prevention strategies like ensuring adequate ventilation and using mold-resistant products.
Regularly check your gear for damage, as compromised equipment can increase your vulnerability.
By prioritizing safety gear, you safeguard your health and foster a sense of community responsibility in tackling mold issues together.
Stay safe and be proactive!
Remove Standing Water Quickly
Standing water poses a significant threat to your property and can accelerate mold growth within just 24 to 48 hours. To mitigate this risk, you must act swiftly using effective water extraction techniques.
Begin by evaluating the extent of the water accumulation. If it’s substantial, consider enlisting professionals who specialize in emergency response tactics to ensure thorough removal.
For smaller areas, utilize a wet/dry vacuum or submersible pump for efficient extraction. Pay close attention to hidden pockets of water, especially in carpets and under floorboards, as these areas can harbor moisture unseen.
After extraction, use fans and dehumidifiers to facilitate airflow, further aiding in moisture reduction. Remember, the quicker you remove standing water, the better your chances are of preventing mold growth.
Dry Out Affected Areas Thoroughly
To effectively prevent mold from establishing itself in your home, you must dry out affected areas thoroughly and promptly.
Start by using dehumidification techniques; industrial dehumidifiers are ideal for large spaces, while smaller units can suffice for localized areas. Make certain you set the dehumidifiers to the lowest humidity setting and keep windows and doors closed to maximize efficiency.
Next, use fans to enhance air circulation, directing airflow towards damp surfaces. Open closet doors and cabinetry to promote moisture evaporation. If possible, remove soaked materials like carpets and drywall to facilitate quicker drying.
Monitor humidity levels with a hygrometer, aiming for a range below 60%.
Regularly check for any hidden pockets of moisture, as they can become breeding grounds for mold.
Clean and Disinfect Surfaces
Once you’ve dried out affected areas, cleaning and disinfecting surfaces is essential to eliminate any remaining mold spores and prevent future growth.
Start by using appropriate surface cleaning methods, such as a mixture of water and detergent, to scrub all affected surfaces. Pay special attention to porous materials, which can harbor spores.
After cleaning, use a disinfectant that’s effective against mold, ensuring you follow the manufacturer’s instructions for proper usage.
Implement mold prevention techniques by ensuring good ventilation and controlling humidity levels in your space.
After disinfecting, consider sealing cleaned surfaces with mold-resistant paint or sealant to provide an additional barrier against future mold growth.
Always wear protective gear, including gloves and masks, while cleaning to safeguard your health.
Remove and Dispose of Contaminated Materials
To effectively remove and dispose of contaminated materials, you need to first identify which items are affected by mold.
Once identified, follow safe disposal methods that minimize exposure and comply with local regulations for hazardous waste.
This ensures your safety, as well as the proper handling of materials that could pose health risks to others.
Identify Contaminated Materials
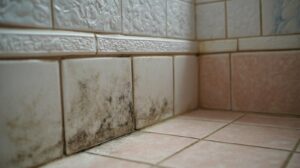
How can you effectively identify contaminated materials in your home? Start by evaluating areas that were exposed to water. Different mold types may have infested various materials.
Look for the following signs of contamination:
Visible Mold Growth: Check for dark spots or fuzzy patches on surfaces.
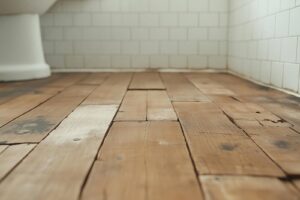
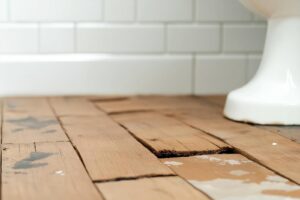
Water-Damaged Materials: Inspect drywall, insulation, and carpets for discoloration or swelling.
Odor: A musty smell often signals mold presence, even if not visible.
Degradation: Examine wooden structures for warping or softness, indicating rot.
Once you spot these contaminated materials, it’s essential to remove them promptly to prevent further mold spread.
Safe Disposal Methods
After identifying contaminated materials, the next step involves safely removing and disposing of them to halt mold growth and protect your home.
Start by wearing protective gear, including gloves and masks, to minimize exposure. Carefully bag the contaminated items in durable plastic, sealing them tightly to prevent spillage.
For materials like carpets and drywall, assess recycling options where available, but remember that heavily contaminated items typically require disposal as hazardous waste.
Contact local waste management for guidance on proper disposal methods, ensuring you adhere to regulations.
By following these steps, you protect your environment and contribute to a community that values safety and sustainability.
Together, we can manage mold risks effectively.
Local Disposal Regulations
Understanding local disposal regulations is essential when dealing with mold-contaminated materials. Compliance ensures safety and protects the community from hazardous materials.
Here are four key steps to follow:
Research Local Guidelines: Check with your local waste management authority for specific disposal rules regarding moldy items.
Separate Contaminated Materials: Clearly distinguish moldy materials from regular waste to prevent cross-contamination.
Utilize Designated Disposal Sites: Locate approved facilities for disposing of hazardous materials to ensure proper handling.
Document Your Disposal: Keep records of what you’re disposing of and where, in case of future inquiries or inspections.
Use Dehumidifiers to Reduce Moisture
While it may seem straightforward, effectively using dehumidifiers to reduce moisture in areas affected by mold damage requires careful consideration of placement and settings.
Start by selecting the right dehumidifier for your space; ensure it has adequate capacity to manage the moisture level. Place it centrally in the affected area to maximize dehumidifier efficiency.
Set the humidity level to around 30-60% for ideal moisture control. Monitor the dehumidifier regularly, checking the water reservoir and emptying it as needed to maintain continuous operation.
For best results, run the dehumidifier continuously until the area feels dry, which may take several days, depending on the severity of the flooding.
Don’t forget to ventilate the space by opening windows or using fans to enhance airflow, as this can considerably improve moisture reduction. Your diligence in this process is vital for preventing further mold growth and ensuring a healthier environment.
Apply Mold Inhibitors to Surfaces
To effectively combat mold growth, you need to choose mold inhibitors that are proven to work on the surfaces in your home.
Apply these inhibitors evenly and thoroughly to ensure maximum coverage and effectiveness.
Don’t forget to follow all safety precautions during this process to protect yourself and others in the area.
Choose Effective Mold Inhibitors
Selecting effective mold inhibitors is essential for maintaining a clean and safe environment, especially in areas prone to moisture.
To ensure you’re using the right mold inhibitor types, consider the following:
Biocide-based inhibitors – These kill mold spores on contact and provide long-term protection.
Preventive coatings – Applied to surfaces, these create a barrier against mold growth.
Natural mold inhibitors – Options like tea tree oil or vinegar offer eco-friendly alternatives.
Chemical solutions – Products containing fungicides effectively prevent mold but require careful handling.
When applying these inhibitors, use proper application techniques, such as spraying or rolling, to ensure even coverage.
Apply Evenly and Thoroughly
Applying mold inhibitors evenly and thoroughly is crucial for their effectiveness in preventing mold growth.
Start by selecting a suitable mold inhibitor that aligns with your mold prevention techniques. Prepare the surfaces by cleaning them to remove any dirt or residues.
Use a spray applicator or a roller to ensure even coverage, paying close attention to corners and crevices where moisture can linger. This method maximizes the effectiveness of the inhibitors and enhances your moisture control strategies.
Allow the solution to dry completely before evaluating the treated areas. Regularly inspect and reapply as necessary to maintain protection.
Follow Safety Precautions
Before you apply mold inhibitors to surfaces, it’s essential to follow specific safety precautions to protect yourself and others in the area. These steps are vital in any mold prevention strategies during your flood recovery process:
Wear Protective Gear: Use gloves, masks, and goggles to prevent skin and respiratory exposure.
Ventilate the Area: Open windows and doors to allow fresh air circulation, reducing inhalation risks.
Test Surfaces: Verify surfaces are dry and free of visible mold before applying any inhibitors.
Read Labels: Follow the manufacturer’s instructions carefully to ensure effective and safe application.
Monitor for Signs of Mold Growth
Regularly monitoring for signs of mold growth is essential in maintaining a healthy environment. Start by visually inspecting areas prone to moisture, such as basements and bathrooms.
Check for discoloration on walls, ceilings, and floors, which may indicate mold presence. Utilize mold detection techniques like moisture meters to assess humidity levels, as elevated moisture can foster mold growth.
It’s imperative to act quickly if you notice any signs. Address leaks and improve ventilation to inhibit mold development.
Consider using dehumidifiers in damp areas, as they play a critical role in long-term prevention.
Keep an eye out for musty odors, as this can signal hidden mold issues. Make it a habit to routinely inspect your home, especially after heavy rains or flooding.
Consult Professionals for Severe Cases
When you encounter extensive mold growth that exceeds your ability to manage, consulting professionals becomes essential.
Attempting to handle severe mold infestations on your own can lead to health risks and further damage. Here are key reasons to seek professional help:
Expertise: Professionals have the training and experience to identify the type of mold and the best remediation methods.
Safety: They use protective gear and equipment to safely handle hazardous mold spores and prevent exposure.
Thoroughness: Professional mold remediation ensures that mold is completely removed, including hidden sources that may be overlooked.
Insurance Claim Assistance: Many remediation companies offer support in maneuvering insurance claims, helping you recover costs effectively.
Frequently Asked Questions
How Long Does It Take for Mold to Start Growing After Flooding?
Mold can start growing within 24 to 48 hours after flooding. To minimize risks, follow flood recovery tips and act quickly to dry affected areas, ensuring you limit the mold growth timeline effectively.
Can I Use Bleach to Clean Mold off Surfaces?
You can use bleach to clean mold off non-porous surfaces, but its effectiveness decreases on porous materials. Always ensure proper ventilation and protective gear, as bleach can create harmful fumes and not eliminate mold spores entirely.
What Are the Health Risks Associated With Mold Exposure?
Mold’s like a silent predator, lurking in your environment. Exposure can trigger mold symptoms such as respiratory issues and skin irritation, while long-term effects may include chronic fatigue and weakened immunity. Prioritize safety and seek help!
How Can I Prevent Mold Growth After Cleanup?
To prevent mold growth after cleanup, implement mold prevention strategies such as maintaining humidity control below 60%. Use dehumidifiers, ensure proper ventilation, and promptly address leaks to create an environment inhospitable to mold.
Is Home Insurance Likely to Cover Mold Damage From Flooding?
Your home insurance might cover mold damage from flooding, but it often depends on specific insurance policies and their coverage limits. Always review your policy details to understand what’s included and ensure you’re adequately protected.
Conclusion
Tackling mold damage after flooding requires swift action and meticulous attention to detail. Mold can start growing within 24 to 48 hours of water exposure. This alarming fact underscores the importance of your prompt response. By evaluating damage, wearing proper safety gear, and utilizing dehumidifiers, you can greatly mitigate health risks and structural damage. Stay vigilant and proactive; your efforts can make all the difference in preventing a mold infestation.