Many people underestimate the potential hazards of a toilet overflow, which can lead to water damage and health risks if not handled promptly. First, you need to assess the situation carefully to guarantee your safety. Once you’ve done that, it’s vital to turn off the water supply to stop further flooding. From there, you’ll need a clear plan to address the mess and prevent future incidents. Here’s how to proceed effectively.
Key Takeaways
- Assess safety by ensuring no one is in the area and avoid contact with contaminated water.
- Turn off the toilet’s water supply immediately to prevent further flooding.
- Remove standing water using towels or a wet/dry vacuum to minimize damage.
- Disinfect affected surfaces with appropriate cleaning solutions to eliminate contaminants.
- Dispose of contaminated materials safely and follow local guidelines for hazardous waste.
Assess the Situation and Ensure Safety
When a toilet overflows, the first step is to assess the situation and secure safety for everyone involved.
Quickly identify if anyone’s in the area and make certain they remain at a safe distance from potential hazards. Safety precautions are essential; if the water appears contaminated, avoid direct contact.
Next, check for electrical outlets or appliances nearby that could pose risks in the event of water exposure. If the overflow is substantial, consider using towels or a mop to contain the water temporarily, preventing further spread.
If you’re in a public or shared space, inform others immediately, prompting an emergency response if needed.
Communicating effectively can help maintain a sense of community and belonging during a stressful situation. Remember, your priority is to keep everyone safe while you prepare for the next steps in addressing the overflow.
Turn Off the Water Supply
To stop the overflow, first locate the shut-off valve, usually found on the wall behind the toilet.
Turn the valve clockwise until it’s fully closed to halt the water flow.
This vital step prevents further water damage and helps you regain control of the situation.
Locate the Shut-Off Valve
One of the first steps to take after a toilet overflow is locating the shut-off valve to stop the water supply. You’ll typically find the valve behind the toilet or along the wall.
There are several shut off types, including ball valves and gate valves. A ball valve has a lever that you can easily turn, while a gate valve requires a bit more effort to twist.
Familiarizing yourself with these valve locations can save you time and frustration during an emergency. Once you’ve identified the valve, you’ll be prepared to take the next steps to manage the overflow effectively.
Turn Valve Clockwise
Quickly grasp the valve handle and turn it clockwise to cut off the water supply. This immediate action is vital to prevent further flooding.
Make sure you’re firm but gentle; overtightening can damage the valve. As you perform this essential task, keep in mind that regular valve maintenance can help avoid similar emergencies in the future.
If the valve feels stuck, a bit of lubricant can ease the process. It’s also wise to familiarize yourself with plumbing tips, such as checking the valve periodically for leaks or wear.
Prevent Further Water Damage
While you’ve already cut off the water supply, preventing further water damage requires immediate action to address the overflow.
Start by removing any standing water using a wet/dry vacuum or towels. This helps minimize moisture that can lead to mold growth. Check for leaks around the toilet base and guarantee the area is dry.
If you notice any persistent dampness, consider using a dehumidifier to absorb excess moisture. Next, inspect the toilet components for wear or damage, as this can aid in future leak prevention.
Finally, keep the area well-ventilated to promote drying. Taking these steps not only safeguards your home from water damage but also fosters a sense of community by ensuring your space remains safe and comfortable for everyone.
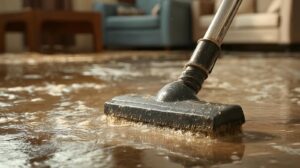
Remove Standing Water
Start by using a wet/dry vacuum to efficiently remove standing water from the affected area. This powerful tool is essential in employing effective water removal techniques.
Make certain you position the vacuum hose into the deepest parts of the water, allowing it to pull out as much liquid as possible. Pay attention to corners and edges where water tends to accumulate, as these spots can pose standing water hazards.
After vacuuming, check for any leftover moisture. If you notice any, consider using absorbent towels or mops to soak it up. Avoid using a regular vacuum; it could cause damage and create electrical hazards.
Once you’ve removed the visible water, open windows and use fans to aid drying. This step not only helps prevent mold growth but also fosters a sense of community responsibility in maintaining a safe, welcoming environment.
Disinfect the Affected Area
After successfully removing standing water, it’s imperative to disinfect the affected area to eliminate any harmful bacteria and prevent unpleasant odors.
Start by choosing effective cleaning solutions specifically designed for disinfecting surfaces that may have come into contact with contaminated water. Look for products containing bleach or hydrogen peroxide, as they’re proven to kill germs.
Wear gloves and a mask for protection while you work. Apply the cleaning solution generously to all affected surfaces, making certain you soak areas like floors, walls, and any items that may have been splashed.
Allow the disinfectant to sit for the recommended time to guarantee maximum efficacy.
Once the time is up, scrub surfaces with a brush or cloth, focusing on corners and crevices. Rinse thoroughly with clean water and dry the area to avoid moisture buildup.
This thorough process will help maintain a safe and hygienic environment for you and your family.
Check for Damage to Surrounding Areas
After addressing the immediate mess, it’s essential to inspect the flooring for any signs of warping or water damage.
Look closely at the walls for staining, which could indicate moisture penetration.
Don’t forget to check the integrity of nearby fixtures, as they may also suffer from the overflow’s impact.
Inspect Flooring for Warping
While you’re dealing with the chaos of a toilet overflow, it’s essential to inspect your flooring for any signs of warping or damage.
Start by checking your flooring materials—tile, laminate, or hardwood—since each reacts differently to moisture. Use a moisture detection tool to identify areas with elevated humidity levels, which could indicate underlying issues.
Look for buckling or curling edges, particularly in hardwood or laminate, as these are clear indicators of water damage. Don’t forget to check the seams between planks; they can harbor moisture if not sealed properly.
If you notice significant warping, it’s wise to consult a professional to assess the damage and explore repair options.
Taking these steps helps guarantee your home remains a safe and comfortable place.
Examine Walls for Staining
Start at the base of the wall and look for wall discoloration.
Use a moisture detection meter to check for hidden dampness.
Inspect corners and seams where moisture tends to accumulate.
Note any peeling paint or wallpaper, which signals potential damage.
After a toilet overflow, it’s essential to examine walls for staining.
Begin by checking for wall discoloration, which could indicate water damage.
Use a moisture detection meter to identify hidden moisture that may not be visible.
Pay close attention to corners and seams, as these areas are prone to accumulation.
Finally, if you notice peeling paint or wallpaper, it’s a sign that further action is necessary.
Addressing these issues promptly can prevent more extensive damage and keep your space safe and inviting.
Check Nearby Fixtures’ Integrity
Once you’ve assessed the walls, check the integrity of nearby fixtures, as they can also sustain damage from an overflow.
Start with a thorough fixture assessment of sinks, bathtubs, and cabinets. Look for signs of warping, discoloration, or mold—these indicate potential water damage.
Next, inspect plumbing connections and hoses for leaks or corrosion, as compromised plumbing can lead to further issues. If you notice any irregularities, it’s wise to conduct a plumbing inspection to verify everything functions properly.
Don’t hesitate to call a professional if repairs exceed your expertise. Taking these steps not only safeguards your home but also fosters a sense of belonging in a well-maintained space.
Your diligence now can prevent bigger headaches down the road.
Dispose of Contaminated Materials
After a toilet overflow, it’s crucial to address any contaminated materials promptly to prevent health risks and further damage.
Follow these steps to safely dispose of contaminated items:
Identify contaminated materials: Check materials like towels, rugs, or paper products that may have come into contact with wastewater.
Use proper cleaning supplies: Gather appropriate cleaning supplies, including disinfectants and gloves, to handle contaminated materials safely.
Seal hazardous waste: Place contaminated items in sturdy, sealed bags to minimize exposure. Label them as hazardous waste to guarantee safe disposal.
Contact local waste management: Reach out to your local waste management facility to understand how to properly dispose of hazardous waste in your area.
Prevent Future Overflows
To effectively prevent future toilet overflows, it’s essential to regularly maintain your plumbing system and be mindful of what you flush.
Start by inspecting your toilet for any signs of wear, such as cracks or leaks. Replace worn components like flappers and fill valves to guarantee peak function.
Next, schedule routine plumbing check-ups. A professional can identify potential issues before they escalate into major problems, enhancing overflow prevention.
Be vigilant about what goes down your toilet—only human waste and toilet paper should be flushed. Items like wipes, feminine products, and excessive paper can lead to clogs and overflows.
Consider using a toilet auger or plunger to clear minor blockages promptly.
Frequently Asked Questions
How Can I Tell if My Toilet Is Clogged?
You can tell your toilet’s clogged if it’s slow to flush, water rises in the bowl, or you notice unusual sounds. Regular toilet maintenance helps prevent clogs, ensuring your plumbing stays in good shape.
Is It Safe to Use a Plunger After an Overflow?
After an overflow, using a plunger can be safe if you take overflow precautions, like wearing gloves and ensuring the area’s clean. Always check for visible debris to avoid additional mess or contamination.
What Cleaning Products Are Best for Disinfecting Bathroom Surfaces?
For a sparkling clean bathroom, embrace natural disinfectants like vinegar and baking soda. Combine them with effective surface sanitizers, ensuring you conquer germs while creating a safe haven everyone can appreciate. You’ll feel right at home!
How Do I Prevent Mold Growth After a Toilet Overflow?
To prevent mold growth after a toilet overflow, dry surfaces immediately, ventilate the area, and use mold prevention products. Address any water damage quickly to keep your bathroom safe and welcoming for everyone.
When Should I Call a Plumber for Help?
When plumbing problems persist, don’t hesitate to call a plumber. If you notice leaks, low flushing power, or persistent clogs, seeking professional help guarantees effective toilet maintenance and prevents plumbing emergencies from escalating into disasters.
To Sum Up
So, after all the chaos of a toilet overflow, you’ve turned into a mini plumber, right? Grab your toolkit and embrace your inner superhero as you tackle the aftermath with gusto. Sure, you might’ve just wanted a peaceful bathroom experience, but hey, who doesn’t love an impromptu water ballet? With a little effort, you’ll not only restore order but also prevent future aquatic adventures. Remember, a well-maintained toilet is your best defense against surprise splashes!